
TL;DR
Storing whole grains properly and milling them fresh at home preserves nutrients and flavor. Using manual mills gives you control and keeps your off-grid kitchen self-sufficient.
Imagine biting into bread with a rich, nutty aroma, freshly milled from grains you stored yourself. That’s the simple magic of whole grains—when you know how to store and mill them at home, you unlock flavors and nutrients that pre-ground flour just can’t match.
This guide will show you practical steps to keep grains fresh, choose the right milling tools, and mill efficiently—even off-grid. Whether you’re cooking for a small family or building a self-reliant pantry, understanding whole grains transforms your kitchen into a powerhouse of nutrition and flavor.
Proper storage in airtight, cool, dark places keeps whole grains fresh for months to over a year.
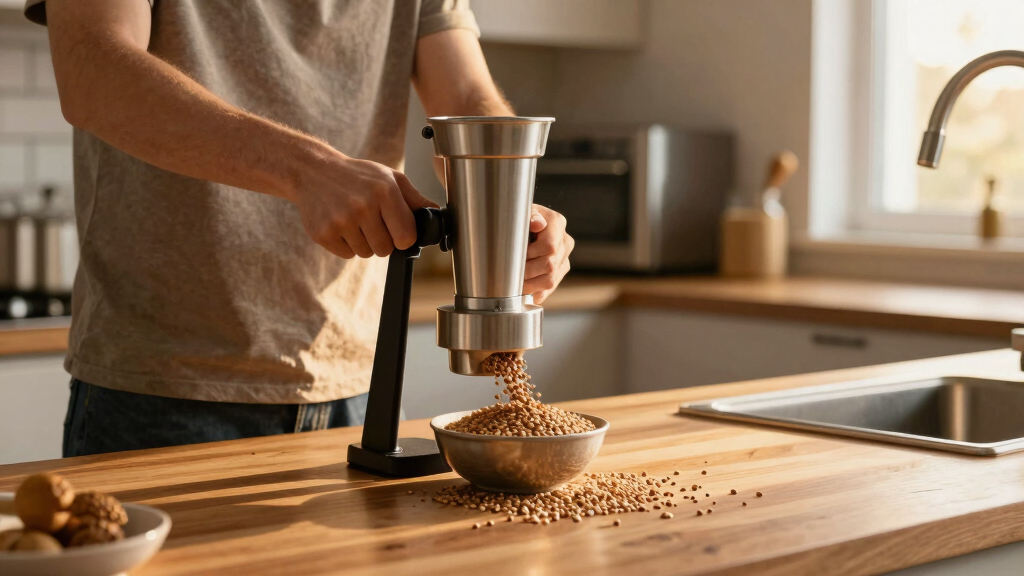
Manual mills are perfect for off-grid living and small batches; electric mills speed up larger processing.
Clean grains before milling and adjust coarseness for different recipes to maximize flavor and nutrition.
Milling grains just before baking preserves nutrients and enhances flavor, giving your food a richer, fresher taste.
Regularly maintain your mill—clean it thoroughly and replace worn parts—to keep it performing well for years.
What Makes Whole Grains Better Than Store-Bought Flour?
Whole grains are a treasure chest of fiber, vitamins, minerals, and antioxidants—preserved because they contain all three parts: bran, germ, and endosperm. When you mill grains at home, you get a fresher, more vibrant flavor and a nutritional boost that’s lost in pre-ground flour, which can sit on shelves for months.
For example, freshly milled wheat flour has a rich, nutty aroma and a coarser texture that makes bread more hearty and satisfying. Plus, milling your own means you control the grind—coarse for rustic bread, fine for pastries, or somewhere in between.
Beyond flavor, milling at home allows you to tailor the texture and particle size of your flour, influencing the final bread or pastry quality. A coarser grind introduces more bran particles, increasing fiber content and adding a chewy texture, while a fine grind creates a softer, lighter product. This customization enhances your baking and cooking, making each batch uniquely suited to your preferences. Additionally, since you mill just before use, you preserve sensitive nutrients like vitamin E and B vitamins that degrade over time in stored pre-ground flour. This means your baked goods not only taste better but are more nourishing, supporting better health and sustained energy.

Corona Manual Grain Mill, Cast Iron Corn Grinder with Hand Crank for Corn, Wheat, Rice, Coffee & Spices, Adjustable Flour Mill for Home Kitchen Use
AUTHENTIC CORONA GRAIN MILL: Heavy-duty cast iron manual grain mill crafted in Colombia. Large 0.8-qt hopper grinds corn,…
As an affiliate, we earn on qualifying purchases.
As an affiliate, we earn on qualifying purchases.
How to Store Whole Grains So They Stay Fresh and Pest-Free
The key to keeping whole grains fresh is controlling moisture, light, and pests. Store grains in airtight containers—glass jars, metal buckets, or food-grade plastic—kept in a cool, dark, dry space. Think pantry shelves away from sunlight or a cellar.
For longer shelf life, refrigerate or freeze grains. A batch of 5 pounds stored in the freezer can last over a year without rancidity. Freezing slows down the natural oils in grains that can become rancid over time, maintaining their freshness and flavor. When storing grains, consider the risk of insect infestation—using airtight, sealed containers prevents pests from contaminating your supply. Regularly check stored grains for signs of spoilage—off smells, mold, or tiny insects—and discard any suspect batches. This vigilance ensures your grains remain safe, nutritious, and ready for milling or cooking at a moment’s notice.
Imagine pulling a jar of golden millet from the freezer during a snowy morning—fresh, nutty, and ready for milling or cooking. Proper storage not only preserves flavor but also maintains the integrity of nutrients, ensuring each meal is as nourishing as it is delicious.

NutriMill Impact Compact High Speed Electric Grain Mill for Fresh Flour Wheat Grinder with Stainless Steel Milling Heads
1200-Watt Motor: Provides the power necessary to mill hard grains like wheat, delivering the perfect texture for bread…
As an affiliate, we earn on qualifying purchases.
As an affiliate, we earn on qualifying purchases.
Choosing the Right Grain Mill for Your Needs
Home grain mills come in two main types: manual and electric. Manual mills are simple, affordable, and portable—great for small batches or off-grid use. Electric mills offer higher capacity, consistent grind, and faster results, perfect if you bake often or process large amounts.
Here’s a quick comparison:
| Feature | Manual Mill | Electric Mill |
|---|---|---|
| Cost | Lower | Higher |
| Capacity | Small batches | Larger quantities |
| Portability | High | Moderate |
| Ease of Use | Requires effort | Less effort, more consistency |
Choosing the right mill depends on your specific needs—consider how much grain you process regularly, your available space, and your budget. For instance, if you want to mill wheat for daily bread without relying on electricity, a manual mill like a Corona grinder or hand-crank model provides independence and simplicity. Conversely, if you’re baking for a large family or want to process multiple grains efficiently, an electric mill can save time and effort, allowing you to produce larger quantities with consistent results. The tradeoff is often between convenience and portability versus capacity and speed. Assess your priorities carefully, and remember that investing in a quality mill can pay off in better flavor, nutrition, and reliability over time.

ProKeeper 2.5-Quart Grain Storage Container with Hinged Lid, Clear – BPA-Free, Airtight Seal, 5.5 x 7.65 x 7.25"
GRAIN STORAGE CONTAINER: This dishwasher safe grain storage container features a silicone seal that keeps rice, beans, quinoa,…
As an affiliate, we earn on qualifying purchases.
As an affiliate, we earn on qualifying purchases.
How to Properly Prepare Grains Before Milling
Before milling, give your grains a quick clean—remove any debris, dust, or small stones. Rinse lightly if needed, then spread them out to dry thoroughly. This prevents damaging your mill and ensures even grinding.
For example, when milling oats, I rinse them lightly to remove chaff, then dry them on a towel for a few hours. It’s a simple step that prolongs your mill’s life and improves grind quality.
Adjust your mill’s coarseness setting depending on your recipe—coarse for hearty bread, fine for pastry doughs. Experiment with small batches to find the perfect texture, as different grains and recipes benefit from varying textures. Proper preparation reduces the risk of clogging or uneven grinding, ensuring your results are consistent and of high quality. Taking these steps also helps avoid introducing excess moisture or debris that can damage the mill or compromise your finished product, making your home milling process smoother and more reliable.

INSELY 750g Grain Mill Grinder, High Speed Electric Stainless Steel Flour Mill for Wheat, Spices, Corn and Other Dry Food Grinders, Multipurpose Electric Grinder for Home Kitchen Use
【ULTRA-FAST & SUPERFINE GRINDING】 Equipped with a powerful 2000W pure copper motor and three-layer stainless steel blades, this…
As an affiliate, we earn on qualifying purchases.
As an affiliate, we earn on qualifying purchases.
Simple Steps for Milling Grain at Home
- Choose your grain and prep it as described above.
- Set your mill to the desired coarseness.
- Fill the mill hopper with the grains.
- Turn the handle or switch on (for electric mills), and collect the freshly ground flour.
- Store or use immediately for the best flavor and nutrition.
For example, I grind a cup of wheat for fresh bread—each step takes less than five minutes, and the aroma of freshly milled flour fills my kitchen instantly. The key to successful home milling is patience and attention to detail—adjusting settings, monitoring the grind, and being ready to refine your technique over time. Larger batches can be processed efficiently with an electric mill, but even small manual mills can produce enough flour for daily use, making your kitchen more self-sufficient and flavorful.
How Freshly Milled Grain Boosts Your Cooking and Baking
Freshly milled grains bring a depth of flavor and texture that pre-ground flour can’t match. Your bread crusts get darker and crunchier, pancakes are more tender, and pasta has a richer bite.
Imagine slicing into a loaf of bread that smells like toasted nuts—each bite packed with flavor, thanks to milling just moments before baking. Plus, nutrients like vitamin E and B vitamins are more bioavailable when grains are ground fresh. Milling grains immediately before use minimizes oxidation and nutrient loss, ensuring maximum health benefits. This means you’re not just eating more flavorful food—you’re also supporting your overall well-being by preserving vital nutrients that degrade over time in stored flour. For whole wheat, rye, or ancient grains, the benefits of freshness are even more pronounced, allowing their unique flavors and textures to truly shine in every dish.
Tips for Maintaining and Cleaning Your Grain Mill
After each use, brush out dust and residual flour—most mills can be cleaned with a dry brush or cloth. For deeper cleaning, disassemble parts and wash with warm water, avoiding soap if possible, as it can leave residues. Regular cleaning prevents buildup that can affect the grind consistency and introduces unwanted flavors or contaminants.
Keep the mill dry and store in a dust-free place. Regularly check for wear and replace parts like burrs or grinding plates as needed. Proper maintenance not only prolongs the lifespan of your mill but also ensures that each batch of flour is ground to the highest quality. For manual mills, a periodic disassembly and gentle cleaning extend their functionality for years, while electric mills benefit from routine inspection to prevent motor or component wear. This attention to detail guarantees your investment remains reliable, consistent, and safe for your culinary endeavors.
Frequently Asked Questions
How do I choose the right grain mill for home use?
Pick a mill based on your processing volume, space, and budget. Manual mills are affordable and portable, perfect for small batches and off-grid use. Electric mills suit larger quantities and frequent baking, offering consistency and speed.
What grains are best for home milling?
Wheat, oats, barley, rye, and spelt are common choices—easy to store and versatile for baking. Quinoa and millet also work well for quick meals or specialty breads. Choose grains based on your cooking preferences and storage capacity.
How long can I store whole grains, and what’s the best way?
Whole grains can last 6 months to over a year in airtight containers stored in a cool, dark place. Refrigeration or freezing extends shelf life further, especially in humid climates. Always check for off smells or pests before milling or cooking.
Can I mill grains that aren’t labeled ‘whole’?
It’s best to mill grains explicitly labeled as whole—these contain all three parts and retain maximum nutrients. Grains labeled as refined or white flour have had the bran and germ removed, making home milling less effective for nutrient retention.
Are there safety tips for milling grains at home?
Always keep your mill clean and dry. Use appropriate personal protective equipment if necessary, especially when disassembling or cleaning. Follow manufacturer instructions—manual or electric—to prevent injury or damage.
Conclusion
Storing and milling your own grains is a simple way to take back control of your food. The fresh aroma, vibrant flavors, and nutrient punch are worth every extra step.
Next time you crack open a jar of whole grains, remember: a little effort now makes a world of difference in your kitchen—and your health.