TL;DR

Get kitchen gear delivered free — and shop member deals
- Fast, free delivery on millions of items
- Access to Prime Big Deal Days deals on October 6–7
- Prime Video, Amazon Music and more included
A tripod suspends a grill or pot over fire, giving you adjustable heat and quick control. Proper setup, safety, and understanding fire variables are essential for successful outdoor cooking.
Cooking over a campfire isn’t just about food—it’s an art of control and patience. A tripod turns a wild flame into a precise cooking tool, letting you adjust height and heat with a simple chain or hook.
Whether you’re roasting a thick steak, simmering a stew, or boiling water for coffee, mastering the setup makes all the difference. This guide shows you exactly how to get reliable results and stay safe while doing it.
Always select a heavy-duty, stable tripod rated for your load to prevent accidents.
Build a small, controlled fire with glowing coals for better heat management than tall flames.
Position your grate 20-30 cm above coals initially, then adjust based on cooking needs.
Control heat by adjusting the distance, adding/removing fuel, and managing airflow—not flames.
Follow strict safety rules: keep a clear zone, never leave fire unattended, and use proper protective gear.
How to Use a Tripod and Grill Grate Over Fire
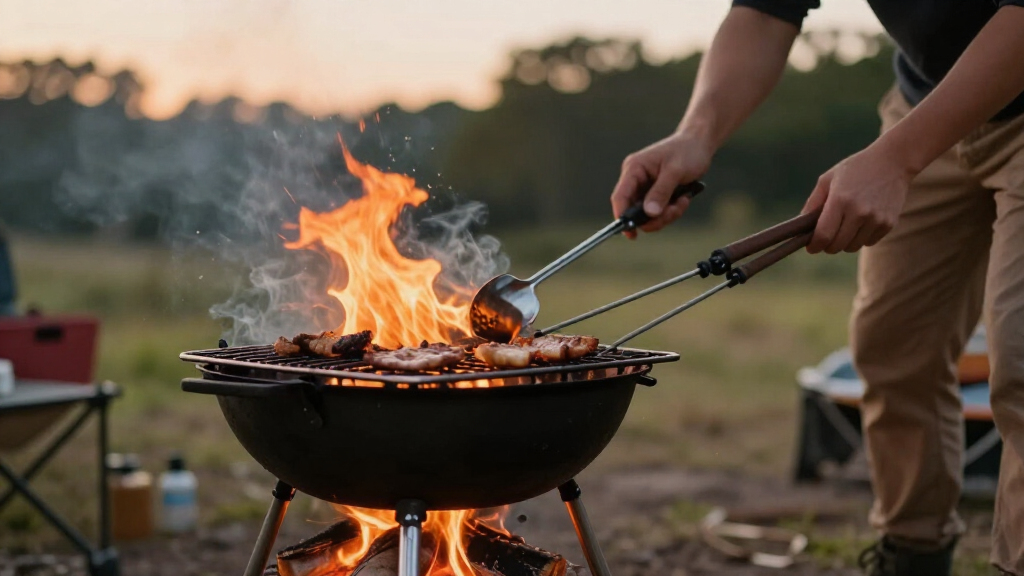
A tripod turns a wild flame into an adjustable cooking system. Suspend the grate, manage glowing coals, and change height to move from hard searing to gentle simmering—with control, patience, and a stable setup.
Begin above glowing coals, then adjust gradually for the food and fire.
Steady radiant heat is more predictable than tall, shifting flames.
Change heat without rebuilding the fire or reaching over the flame.
Set up before you strike a match
Stability is non-negotiable. Assemble and test the complete suspension system on firm, level ground before lighting the fire beneath it.
Choose a legal fire site
Use an established ring or fireproof bare surface, clear of tents, brush, roots and low branches. Check local restrictions first.
Spread the legs wide
Place every foot firmly on level ground. Keep the feet outside the hottest area and never balance them on loose gravel.
Check chain and grate
Confirm the cookware hangs level. Inspect hooks, fasteners and joints, then apply gentle pressure to test stability.
Build small and controlled
Use dry untreated hardwood or permitted charcoal. Let the fire settle into a compact bed of glowing coals.
Start high, lower slowly
Begin around 20–30 cm above the coals. Adjust from the side with heat-resistant gloves—never reach over flames.
Distribute the coals
Bank more coals under one side for searing and fewer under the other for slower cooking, resting or holding.
Flame size is not a thermometer
Glowing coals deliver steadier radiant heat with less soot. Adjust one variable at a time and watch how the food responds.
Four variables shape every cook
Match distance to technique
Sear steaks, crisp skins and char vegetables quickly.
Cook interiors, protect sugary glazes and hold food warm.
Choose the zone, then the technique
Preheat and clean the grate before cooking. Lightly oil the food rather than pouring oil over the fire, where it can trigger flare-ups.
| Food or vessel | Best zone | Grate position | Best practice | Watch for |
|---|---|---|---|---|
| Steak & burgers | ✓ HOT → COOL | Low to medium | Sear first, then finish away from dense coals. | ~ FAT FLARE-UPS |
| Chicken pieces | ✓ TWO-ZONE | Medium to high | Cook through indirectly; finish over direct heat. | ~ BURNT SKIN |
| Fish & seafood | ✓ MODERATE | Medium | Use a clean grate, basket or foil packet. | ✗ OVERCOOKING |
| Vegetables | ✓ FLEXIBLE | Medium to high | Roast gently or lower briefly for a quick char. | ~ THIN CUTS |
| Dutch oven stew | ✓ STEADY COALS | High | Keep the lid fitted and stir carefully from the side. | ✗ LOAD & SCALDS |
| Sugary marinades | ✓ COOL SIDE | High | Build color gradually, then finish briefly over heat. | ✗ FAST BURNING |
Treat every component as hot
A stable tripod is only one part of safe cooking. Control the surroundings, use suitable materials and keep extinguishing equipment within reach.
Never use volatile fuel
Gasoline, alcohol and similar liquids can flash, spread flame and cause severe burns. Do not use them to start or revive a fire.
Avoid unsafe materials
Do not heat galvanized, painted or plastic-coated metal. Avoid river rocks, wet stones and unknown masonry that may crack or spall.
Maintain a clear zone
Keep children, pets, dry vegetation and loose equipment away. Have water, a shovel or an appropriate extinguisher ready.
Extinguish completely
Follow local rules. Where water is permitted, drown, stir and repeat until the ash and coals are fully cool to the touch.
Stable frame. Small fire. Steady attention.
The tripod provides precision only when the load is secure and the fire remains manageable. Make measured adjustments and let the coals—not tall flames—do the work.
Choose the Right Tripod for Safe, Stable Cooking
The first step is selecting a tripod that can handle your gear. Look for steel or heavy-duty stainless steel rated for at least 50-100 pounds. A stable, wide stance on level ground prevents tipping, especially when suspending heavy Dutch ovens or water-filled pots.
Imagine setting up your tripod on uneven gravel—one leg sinks, and suddenly your pot tilts. Stability is non-negotiable. Check the manufacturer’s weight limit, and avoid galvanized or painted metals that can release fumes when heated.
Choosing a sturdy tripod isn’t just about preventing accidents; it directly affects your cooking quality. An unstable setup can cause swings or tilts that disrupt heat consistency, leading to uneven cooking or even dangerous spills. The tradeoff often involves weight and portability; heavier tripods tend to be more stable but less convenient to carry. Balancing durability with practicality ensures your setup remains reliable over multiple trips, maintaining safety and cooking performance.
heavy-duty camping tripod for cooking
As an affiliate, we earn on qualifying purchases.
As an affiliate, we earn on qualifying purchases.
Step-by-Step: How to Set Up Your Tripod and Grill Grate
- Pick a safe spot. Use a dedicated fire ring or a fireproof patch on bare soil. Keep clear of tents, low branches, and dry brush.
- Spread the tripod legs wide. Place it on firm, level ground outside the hottest part of the fire.
- Attach the chain or hook. Test that your grill or pot hangs level and adjust if needed.
- Build a manageable fire. Use dry hardwood or charcoal, keeping flames small and controlled.
- Lower the grate gradually to the desired height. Use heat-resistant gloves, and never reach directly over flames.
- Create heat zones. Push more coals under one side for searing, fewer for simmering or warming.
For example, when grilling steaks, start with the grate about 20-30 cm above the coals. Adjust as needed to prevent flare-ups or uneven cooking. Recognizing how the height affects heat transfer is crucial—closer for quick searing, higher for gentle cooking. This tradeoff impacts flavor, texture, and safety; too close can cause charring or flare-ups, while too high may result in undercooked food. Being deliberate about height adjustments allows you to fine-tune your cooking process and achieve consistent results.
adjustable grill grate for campfire
As an affiliate, we earn on qualifying purchases.
As an affiliate, we earn on qualifying purchases.
How to Control and Adjust Heat Over Your Fire
Heat control hinges on four variables: distance from the fire, fuel quantity, airflow, and cooking time. According to an anonymous researcher, a common mistake is assuming tall flames mean hot food. Instead, glowing coals produce steady, predictable heat.
To fine-tune, raise or lower the grate, add or remove coals gradually, and adjust airflow by shielding parts of the fire or opening vents. For example, if your food is sizzling too fast, lift the grate higher or shift it over cooler coals. This method allows you to respond dynamically to different foods and cooking stages, providing precision that tall flames can’t offer. The tradeoff is that adjusting these variables requires attentiveness and experience; misjudging can lead to uneven cooking or burnt food. The key is understanding that the quality of heat depends more on the type of heat (glowing coals) than on the size of flames, which are less reliable indicators of temperature. Properly managing these variables ensures consistent results and minimizes the risk of overcooking or flare-ups.
Always monitor your fire closely, especially in windy conditions, which can gust sparks or cool the fire unevenly. Using a food thermometer helps achieve perfect doneness without guesswork, but mastering the subtle adjustments in heat is what elevates your outdoor cooking to professional levels.
fireproof tripod for outdoor cooking
As an affiliate, we earn on qualifying purchases.
As an affiliate, we earn on qualifying purchases.
Safety Tips for Using a Tripod and Fire Responsibly
Safety is the backbone of outdoor cooking. Never use gasoline or volatile liquids to start or revive your fire. Keep a clear safety zone around the setup, and always have water or a fire extinguisher nearby. An important rule: never leave the fire unattended until the ashes are completely cool.
Be cautious with materials—avoid river rocks or unknown masonry that can shatter when heated. Use dry, untreated hardwood, and keep raw and cooked foods separate to prevent contamination.
For example, while cooking a stew in a suspended Dutch oven, fit the lid tightly and stir carefully. Remember, every metal component gets hot—use long-handled tools and heat-resistant gloves. Recognizing hazards like unstable setups or flammable surroundings is essential for safe cooking. For instance, a loose tripod or uneven ground can cause tipping, leading to accidents or fires spreading. Always double-check stability before adding food or fuel, and consider environmental factors like wind that can cause sparks or shift your flame. The tradeoff here involves vigilance versus convenience—taking extra precautions might slow down the process but significantly reduces risk, ensuring safe and enjoyable outdoor cooking experiences.
As an affiliate, we earn on qualifying purchases.
Best Foods and Techniques for Tripod Cooking Success
A tripod and grate excel at food that benefits from direct or indirect heat. Think steaks, burgers, sausages, chicken pieces, fish, and veggie skewers. Also great for cast iron skillet meals, stews, and baked bread in Dutch ovens.
For example, when roasting peppers or corn, position the grate higher for gentle roasting or lower for quick charring. Thin cuts burn quickly—keep them over the cooler zone or raise the grate slightly. Understanding how different foods respond to heat allows you to manipulate cooking times and textures intentionally. For instance, vegetables like peppers require gentle heat to develop flavor without burning, while thin meats need quick, high heat to sear properly. Using foil packets for vegetables or seafood helps retain moisture and flavors, but over-reliance can sometimes trap excess moisture, leading to sogginess. Always preheat the grate to prevent sticking—this enhances browning and flavor development. Remember: sugary marinades caramelize fast, so position those foods carefully or cook over cooler coals. The tradeoff involves balancing heat for flavor versus the risk of burning delicate ingredients, which requires attentiveness and experience.
Avoid Common Tripod and Fire Mistakes
Many errors come from rushing or neglecting safety. Building a fire that’s too large, setting up the tripod after the fire burns, or placing tripod feet on loose soil can cause accidents. Overloading the tripod or suspending heavy loads too low risks tipping or grease fires.
For instance, hanging a heavy Dutch oven too close to the flames can cause flare-ups or tipping. Using resinous softwoods like pine creates excessive smoke and sparks, which can lead to unpredictable flare-ups or uncontrolled fires. Always check stability before adding food or fuel, and think about how the load’s weight distribution affects the tripod’s balance. Remember, flames do not always reflect temperature—glowing coals are your best indicator for steady heat.
Additionally, neglecting to clear the area of flammable materials or using improper materials like river rocks that can explode when heated are common hazards. These mistakes not only endanger safety but also compromise cooking quality. Overloading or misplacing the load can cause the tripod to topple, spilling hot contents or causing fires. Always assess the stability, load limits, and surroundings before starting, and understand that rushing or taking shortcuts increases the risk of accidents. The tradeoff here is between speed and safety—prioritizing safety ensures a successful and enjoyable outdoor cooking experience without hazards.
Modern Tripod Features That Make Life Easier
Today’s tripods often include collapsible legs, height-marked chains, swiveling arms, and modular accessories like grates and lantern hooks. These innovations save time and boost safety, especially in rugged outdoor conditions.
For example, a tripod with height indicators helps you set consistent cooking heights. Swiveling arms allow you to rotate the grate or pot without disturbing the fire. Stainless steel models resist corrosion and are easier to clean after a long day outside.
Portable fire pans and raised fire pits are also gaining popularity, reducing ground impact and increasing stability on uneven terrain.
Modern features not only enhance convenience but also improve safety by making adjustments more precise and reducing the risk of accidental drops or destabilization. For instance, adjustable height chains help you fine-tune the distance from heat sources, which is crucial for delicate cooking. Swiveling arms prevent the need for repositioning the entire setup, minimizing fire disturbance. These innovations reflect a design evolution focused on maximizing control, safety, and ease of use—especially valuable when you’re miles from help or tools. Embracing these features can significantly elevate your outdoor cooking experience, making it more reliable and enjoyable.
Frequently Asked Questions
How high should the grate be above the fire?
The ideal height is usually 20–30 cm above glowing coals. This distance allows for enough heat transfer while preventing flare-ups or charring. Adjusting the height based on the food’s delicacy and cooking time is crucial—closer for searing, higher for gentle roasting. Always observe how your food responds and tweak accordingly to maintain steady, even heat. Recognizing the importance of proper height helps avoid common pitfalls like burning or uneven cooking, ensuring your food cooks evenly and safely while maximizing flavor and texture.
Should I cook over flames or coals?
Coals provide a more consistent, steady heat source essential for controlled cooking. Flames tend to be unpredictable—causing flare-ups, uneven heat, and soot buildup. Use flames primarily for ignition or quick searing, then shift to glowing coals for the main cooking phase. This approach helps achieve better results and reduces the risk of burnt or undercooked food. Understanding this tradeoff allows you to better manage your fire and adapt to different cooking needs, ultimately leading to more successful outdoor meals.
What kind of wood is best?
Dry, untreated hardwoods like oak, maple, or hickory are ideal because they produce long-lasting, steady coals that maintain a consistent temperature. These woods burn cleanly with minimal sparks, reducing safety hazards and smoke. Softwoods like pine or resinous woods tend to burn unpredictably, produce excessive sparks, and release toxic fumes, complicating your cooking process. Choosing the right wood directly impacts heat stability, safety, and flavor—making it a critical consideration for effective off-grid cooking.
Can I use charcoal?
Yes, charcoal is a popular and reliable fuel choice for outdoor cooking over tripods. It burns cleaner and produces more uniform heat than wood, allowing precise temperature control. When using charcoal, ensure proper ventilation, and never leave the fire unattended. Its steady heat makes it especially suitable for longer cooking sessions or foods requiring consistent temperatures, though it still demands careful safety practices. Understanding how to manage charcoal effectively can greatly improve your cooking outcomes and safety.
How do I prevent the grate from swinging or tipping?
Secure the grate by hanging it from evenly spaced attachment points or using a three-point suspension system, which distributes weight evenly and minimizes swinging. Always keep the load centered and avoid abrupt movements that could destabilize the setup. In windy conditions, brace the tripod further—stake down the legs or use additional supports—to maintain stability. Regularly check the suspension system for wear or looseness before cooking to prevent accidents. Properly securing your equipment ensures safety and consistent cooking, especially in unpredictable outdoor environments.
Conclusion
Mastering a tripod and grill grate over fire transforms a chaotic blaze into a reliable, adjustable cooking station. Safety, patience, and understanding fire dynamics are your best tools for great outdoor meals.
Next time you gather around the flames, remember: control is the secret to delicious, safe, off-grid cooking. Keep experimenting, stay vigilant, and enjoy the simple power of fire and food.
Fall Picks
fall essentials
As an affiliate, we earn on qualifying purchases.