TL;DR

Get kitchen gear delivered free — and shop member deals
- Fast, free delivery on millions of items
- Access to Prime Big Deal Days deals on October 6–7
- Prime Video, Amazon Music and more included
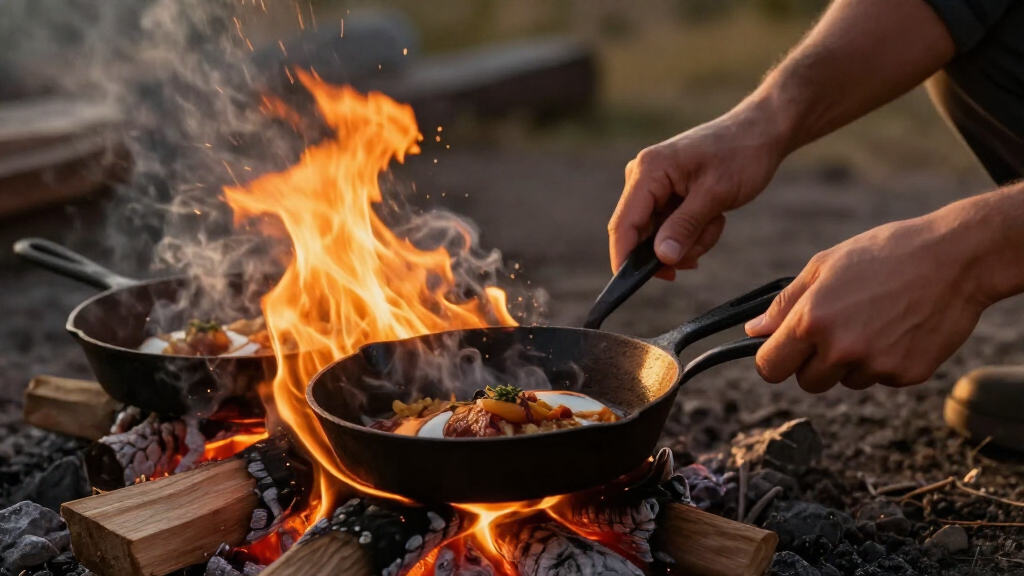
Campfire heat isn’t just flames—it’s about hot coals and zone management. Knowing the right cooking times and how to control heat zones turns a wild fire into a reliable outdoor kitchen.
If you’ve ever struggled with unevenly cooked food on your campfire, you’re not alone. The secret lies in understanding the different heat zones—hot over the flames, gentle at the edge, and everything in between. Master this, and your outdoor meals will go from improvisation to precision.
This guide breaks down how to recognize, create, and use campfire heat zones effectively. Expect practical tips, real-world examples, and a clear map for cooking anything from hot dogs to stews. Ready to turn that flickering flame into your outdoor kitchen?
Use glowing embers—not open flames—for consistent, controllable heat.
Build your fire early to develop a stable coal bed before cooking begins.
A two-zone fire setup allows for flexible cooking—hot sear then gentle simmer.
Estimate temperature zones with the hand test: 2–3 seconds = hot, 4–5 = medium, 6–8 = low.
Cooking times vary by food and heat, but internal temperature is the safest guide for doneness.
Field Guide · Open-Fire Cooking · Vol. 01
Cooking Times & Heat Zones on a Campfire
Campfire heat isn’t just flames — it’s hot coals and zone management. Learn to read the fire, map its heat, and turn a flickering pile of wood into a reliable outdoor kitchen: from 5-minute hot dogs to 3-hour Dutch-oven braises.
directly over flames
high heat
before cooking
“Cook over glowing embers, not open flames — steadier heat, better results.”
The cardinal rule of camp cookingover flames
fire-bed edge
lead time
poultry
coal-math target
01 · Zone Map
Every campfire has three kitchens
The hottest spot sits directly over the flames; the glowing edges run a steady medium; and the coal bed underneath is the engine that powers it all. Recognize the zones and you stop burning food.
Over the Flames
The hottest real estate at camp — directly above active flames and thick coals. Sear steaks, boil water, char fast, then move food on before it scorches.
Edge of the Fire Bed
Softly glowing coals at the perimeter deliver steady, forgiving heat. Simmer stews, finish bone-in chicken through, and keep plates warm without burning.
Glowing Embers
Embers — not flames — are the cooking medium. Rake graduated piles: thick heap = hot, thin layer = medium, sparse scatter = low.
Heat Spectrum · °F across the fire bed
Gentle at the ash-grey edge, fierce at the flame core — plan where each dish lands.
High Heat
Palm 5 inches above the coals — if you pull away in 2–3 seconds, sear and boil with confidence.
Medium Heat
The all-purpose zone: burgers, sausages, foil packs and griddle work live here.
Low Heat
Gentle enough for slow braises, keeping food warm, and finishing thick cuts through.
02 · Time Chart
How long over medium coal heat?
Times are ranges, not promises — heat intensity, food thickness, wind and altitude all shift the clock. Internal temperature, not time, decides doneness.
Off the chart: Dutch-oven stews and braises run 1–3 hours with regular coal rotation. Turn foil packets and rotate food for even cooking — and remember water boils ≈1°F lower per 500 ft of elevation gained.
03 · Head to Head
Flames vs. coals: which cooks better?
Flames flicker and flare; coals radiate evenly and adjust with a rake. For most camp cooking, coals win on reliability — flames earn their keep for the first sizzle only.
| Feature | Over Flames | Over Coals ★ |
|---|---|---|
| Temp stability | ✗ Fluctuates wildly — easy to scorch | ✓ Steady, predictable heat |
| Best for | ~ Searing, quick browning, boiling | ✓ Slow cooking, simmering, baking |
| Control | ~ Needs quick attention and constant moving | ✓ Forgiving — rake coals to adjust |
| Risk of burning | ✗ High — flames flare unpredictably | ✓ Low — coals burn evenly |
| Verdict | ~ The edge of fire — first sizzle only | ✓ The everyday workhorse of camp cooking |
Sear over flame, finish over coals. Balance speed against control and the meal lands exactly where you want it.
04 · Fire Control
Six tricks that tame the flame
Heat management is a skill, not luck. Build early, feed one side, and adjust with coals or height — not guesswork.
Build the fire early
Light it 45–60 minutes before cooking so flames settle into a bed of glowing, even coals.
LEAD TIME · 45–60 MINFeed wood on one side
New wood burns down on one flank, giving you a continuous supply of fresh coals to rake into the cooking zone.
HOT SIDE → COOK SIDELift, don’t rake
An adjustable grill grate or tripod chain raises and lowers food without disturbing the fire or its zones.
GRATE · TRIPOD · CHAINCount your coals
Diameter + 3 coals on top, diameter − 3 underneath lands a Dutch oven at roughly 350°F.
Ø+3 TOP / Ø−3 BASE ≈ 350°FSpread and shift
Fire running hot? Spread the coals out and move food toward the cooler edge until it settles.
SPREAD COALS · MOVE OUTAdd dry hardwood
Oak, hickory and maple burn longer and hotter than softwoods like pine — steadier heat, no resinous flavor.
OAK · HICKORY · MAPLE05 · The Two-Zone Play
Sear hot, finish gentle — one fire, two gears
Rake coals thick on one side and sparse on the other: a natural direct/indirect split, just like a grill. Fewer flare-ups, no burnt outsides with raw centers.
Pile the coals
Heap coals thick on one side; leave the other sparse or bare for gentle heat.
Lock in flavor
Start meat over the hot side to build a crust and seal in the juices.
Move to cool
Slide food across the grate or skewers to the indirect side before it chars.
Cook through gently
Let steady medium heat bring thick cuts to their target internal temperature.
Pull and serve
Rest off the heat, verify the temp, and plate — no guesswork, no burnt meals.
From spark to plate · the campfire cooking chain
What Are the Key Heat Zones on a Campfire—and How to Use Them
Heat zones on a campfire are simple: the hottest spot is directly over the flames—up to 1,000°F—perfect for searing or boiling. The edges of the fire bed, where coals glow softly, provide a steady, medium heat around 250–400°F, ideal for simmering or slow cooking. Recognizing these zones matters because it allows you to optimize your cooking process, prevent burning, and ensure even doneness. For example, searing meats over the high heat zone locks in flavor and creates a crust, while moving them to the cooler edge finishes cooking without overcooking or charring. Raking coals into a graduated pile creates natural heat zones—thick coal heaps burn hot, sparse patches stay cooler—giving you flexibility. Using the hand test helps gauge heat quickly; understanding that 2–3 seconds hold indicates high heat, 4–5 seconds medium, and 6–8 seconds low, helps you adapt on the fly. This awareness means you can avoid the common pitfall of burning food on high flames or undercooking over low heat, resulting in more predictable, better-tasting meals.
As an affiliate, we earn on qualifying purchases.
How Long Does It Take to Cook Common Foods Over a Campfire?
Cooking times are not just about the clock—they reflect the heat intensity, food thickness, and your setup. Understanding these factors helps prevent undercooking or burning. For instance, hot dogs or sausages typically take 5–10 minutes over medium heat, but turning often prevents scorching and ensures even cooking. Burgers, about 1 inch thick, need 8–14 minutes, with flipping once, aiming for an internal temp of 160°F—this internal temperature is crucial because it ensures food safety and proper texture. Bone-in chicken pieces require 30–45 minutes on indirect heat; rushing this can lead to raw centers or burnt exteriors. Fish fillets in foil cook in 10–15 minutes, but flipping halfway helps achieve even doneness. Vegetables in foil take 15–25 minutes; rotating them ensures uniform cooking. Whole potatoes buried in hot coals need 45–60 minutes—patience here prevents undercooking, especially since larger foods take longer to heat through. Corn on the cob, 10–15 minutes, is quick but benefits from turning for even char. Boiling water in a kettle or pot takes 5–15 minutes depending on fire strength. Stews or braises in a Dutch oven need 1–3 hours; shifting coals for even heat avoids scorching or uneven cooking. Remember, internal temperature is your best safety guide: 165°F for poultry, 160°F for ground meats, 145°F for fish and steaks. This focus on internal temp avoids guesswork, ensuring your food is both safe and delicious.
As an affiliate, we earn on qualifying purchases.
Simple Tricks to Manage Heat and Keep Food from Burning
Controlling heat on a campfire is a skill that can be developed with practice. Building your fire early—30 to 60 minutes before cooking—allows you to develop a bed of glowing, hot coals that provide consistent heat. Feeding wood onto one side of the fire creates a natural division between hot and cooler zones, giving you precise control. Moving food away from direct flames or high heat zones prevents burning and charring, especially important for delicate items. Using a grill grate or tripod chains allows you to lift or lower food without disturbing the fire, maintaining stable heat zones. A practical tip: estimate about six to eight coals around your pot or pan for roughly 350°F; adjusting the number of coals changes the temperature, giving you more control. When the fire gets too hot, spread out the coals or shift your food outward to the cooler edge; when it’s too weak, add dry hardwood like oak or hickory, which burn longer and hotter, giving you more consistent heat. These techniques help you avoid common pitfalls—burnt food or raw insides—and offer a reliable way to manage your heat zones effectively, turning a wild fire into a precise cooking tool.
As an affiliate, we earn on qualifying purchases.
Compare Cooking Over Flames vs. Coals: Which Works Better?
| Feature | Over Flames | Over Coals |
|---|---|---|
| Temperature Stability | Fluctuates wildly; easy to scorch | Steady, predictable heat |
| Best for | Searing, quick browning | Slow cooking, simmering, baking |
| Control | Requires quick attention, moving food | More forgiving, easier to regulate |
| Risk of burning | High — flames can flare unpredictably | Low — coals burn evenly |
For most campfire cooks, coals win in reliability because they provide a more consistent and controllable heat source. Flames are great for quick searing or charring but are difficult to manage for longer, gentle cooking. The flickering nature of flames makes it hard to maintain a steady temperature, leading to uneven results or burnt spots. Coals, on the other hand, radiate heat evenly and can be easily adjusted by raking or moving, making them the preferred choice for most slow-cook or simmer tasks. Think of flames as the edge of fire—useful for quick sizzles and initial searing—but for consistent, predictable meals, coals are the better option. This understanding helps you choose the right method based on your cooking goal, balancing speed and control to achieve perfect outdoor dishes.
As an affiliate, we earn on qualifying purchases.
Why a Two-Zone Fire Setup Makes Your Cooking Easier
A two-zone fire setup creates a natural boundary: one side with hot coals and flames, the other with cooler, sparse coals or ash. This layout mimics a grill’s direct and indirect zones, allowing you to sear over high heat and then move food to a lower heat for finishing. The advantage is significant: it provides flexibility in managing cooking stages without needing to start a new fire or constantly adjust the fire itself. Searing over high heat locks in juices and adds flavor, while transferring to a cooler zone prevents burning or overcooking. This method reduces flare-ups caused by fat drippings and allows you to cook thicker cuts thoroughly. To set up, rake coals into a pile on one side of your fire pit, leaving the other side with fewer or no coals for gentle heat. Using a grate or skewers makes it easy to move food between zones, giving you control over cooking speed and doneness. Mastering this layout means less guesswork, fewer burnt meals, and more consistent results—turning your campfire into a professional-style outdoor kitchen.
Handling Unexpected Heat Fluctuations and Fixing Common Problems
If your fire gets too hot, the first step is to spread out the coals or move your food to a cooler zone to prevent burning. Conversely, if the fire is too weak, adding dry hardwood like oak or hickory can boost heat output because these woods burn longer and hotter, giving you more consistent control. For uneven heat distribution, shifting your food around the fire helps ensure even cooking. Wind and rain can unexpectedly disrupt your setup; having a fire-safe cover or switching to a portable stove can mitigate these issues. Quick adjustments—raking coals, repositioning food, or adding fuel—are essential skills. For very hot fires, use long-handled tools or tongs to keep a safe distance from flare-ups. When the fire is weak, avoid green or wet wood, which smokes and cools the fire, making control difficult. Patience is key: small, deliberate adjustments will help maintain stable heat, preventing food from burning or remaining raw. Developing this troubleshooting mindset ensures you can adapt to unpredictable conditions, making your outdoor cooking safer and more successful.
Frequently Asked Questions
How long should I wait after starting the fire before I can cook?
Give your fire at least 30 to 60 minutes to develop a good bed of glowing coals. During this time, the flames die down, and the embers become steady, providing more predictable heat for cooking.
How do I tell how hot my fire is without a thermometer?
The hand test is your best bet: hold your palm about 5 inches above the coals. 2–3 seconds before pulling away indicates high heat, 4–5 seconds is medium, and 6–8 seconds is low. It’s rough but reliable.
Is it safe to cook directly over flames?
While you can quickly toast marshmallows or sear thin cuts over flames, most foods benefit from cooking over coals or in indirect zones. Open flames tend to flare unpredictably and can scorch food or create uneven cooking.
How do I prevent burning the outside and raw inside?
Move food to the indirect or edge zone once it’s browned. Use a two-zone setup: sear over high heat, then finish in the cooler zone. Thicker cuts need more time, so patience and zone management matter.
What’s the best type of wood for campfire cooking?
Hardwoods like oak, hickory, and maple burn longer, hotter, and cleaner—perfect for steady heat. Avoid softwoods such as pine or fir, which burn fast and resinously, causing flare-ups and smoky flavors that can ruin your food.
Conclusion
Mastering heat zones transforms your campfire from a flickering nuisance into a reliable outdoor kitchen. Focus on glowing coals, control your zones, and always check internal temperatures. With a little practice, you’ll turn wild fires into precise tools for delicious meals.
Next time you build a fire, picture the different zones—hot, warm, cool—and use them to your advantage. That vivid glow isn’t just pretty; it’s your secret weapon for perfectly cooked food in the wild.
Evergreen bestsellers Picks
bestsellers
As an affiliate, we earn on qualifying purchases.