
TL;DR
A stovetop espresso maker brews rich coffee in 5-10 minutes by heating water under pressure. Proper assembly, grind size, and cleaning are key to great flavor and durability.
Always use finely ground coffee, similar to espresso grind, for best results.
Fill water up to the safety valve, no more, no less, to avoid overflow or weak brew.
Assemble the moka pot tightly but avoid over-tightening to prevent damage or leaks.
Place on medium heat and listen for the gurgling sound—remove from heat immediately for optimal flavor.
Regular cleaning with warm water and occasional vinegar keeps your moka pot brewing perfectly.
How to Use a Stovetop Espresso Maker Step by Step
TL;DR: A stovetop espresso maker brews rich coffee in 5-10 minutes by heating water under pressure. Proper assembly, grind size, heat control, and cleaning are the difference between a bold morning shot and a bitter, leaky brew.
The moka pot works because every chamber has a job.
The bottom chamber heats water, the filter basket holds coffee, the upper chamber collects the brew, and the safety valve regulates pressure. Once you understand the parts, assembly and troubleshooting become much calmer.
Bottom Chamber
Fill with cold water up to the safety valve. This gives the brew enough pressure without flooding the basket.
Filter Basket
Load finely ground coffee and level it gently. Do not tamp, because too much resistance can cause leaks.
Upper Chamber
This is where espresso-like coffee rises as steam pressure pushes water through the grounds.
Pressure Valve
A clean valve helps prevent dangerous pressure buildup when grind size, water, or assembly is off.

Primula Classic Stovetop Espresso and Coffee Maker, Moka Pot for Italian and Cuban Café Brewing, Greca Coffee Maker, Cafeteras, 6 Espresso Cups, Silver
CRAFT COFFEE AT HOME: Produces six demitasse/espresso servings of rich, smooth espresso coffee in minutes. Craft your own…
As an affiliate, we earn on qualifying purchases.
As an affiliate, we earn on qualifying purchases.
Six moves from empty pot to full-bodied coffee.
Consistency matters more than force. Use the same water level, similar grind size, gentle assembly, and a medium flame each time, then adjust one variable at a time.
Fill
Add cold water to the bottom chamber up to the safety valve, no higher.
Load
Fill the basket with fine coffee, level the top, and leave it untamped.
Seal
Brush grounds from the rim, then screw the top chamber on firmly.
Heat
Set the pot over low-to-medium or medium heat for controlled extraction.
Listen
When the pot hisses or gurgles, the brew is almost complete.
Pull
Remove from heat immediately, pour carefully, then rinse once cool.
Primula Classic Stovetop Espresso and Coffee Maker, Moka Pot for Italian and Cuban Café Brewing, Greca Coffee Maker, Cafeteras, 6 Espresso Cups, Silver
CRAFT COFFEE AT HOME: Produces six demitasse/espresso servings of rich, smooth espresso coffee in minutes. Craft your own…
As an affiliate, we earn on qualifying purchases.
As an affiliate, we earn on qualifying purchases.
Great flavor lives in the balanced middle.
Too fine, too hot, or too long can turn coffee bitter. Too coarse, too cool, or underfilled can make it weak. The moka pot rewards small, repeatable adjustments.

DXary 5 Pieces Coffee Brush Set Professional Espresso Brush Kit Include Wooden Coffee Grinder Machine Cleaning Brush and Nylon Espresso Brush for Coffee Machine Group Head (5)
Package Include: 5 Pieces coffee cleaning brush set in total, 3 pieces nylon espresso brush (In 3 size)…
As an affiliate, we earn on qualifying purchases.
As an affiliate, we earn on qualifying purchases.
Fix bitter, weak, leaking, or slow brews fast.
Most moka pot problems trace back to grind, water level, heat, or sealing. Use this comparison before changing beans or replacing parts.
| Symptom | Likely Cause | Quick Fix | Best Practice |
|---|---|---|---|
| Bitter coffee | ✗ Heat too high or brew left on stove too long | Remove at first gurgle and cool the base briefly | ✓ Low-to-medium or medium heat |
| Weak coffee | ~ Grind too coarse or water below target | Use finer grounds and fill to the valve level | ✓ Fine espresso-like grind |
| Leaking side seam | ✗ Grounds on rim, loose seal, or damaged gasket | Clean the rim and tighten firmly without forcing | ✓ Clean rim before assembly |
| Overflowing | ✗ Overfilled water chamber or packed coffee | Keep water below the valve and never tamp | ✓ Level coffee gently |
| Slow or stalled brew | ~ Clogged filter, grind too fine, or residue buildup | Rinse parts thoroughly and clear the filter holes | ✓ Warm-water clean after every use |
Coffeemaker Brush for Chemex with White Handle, Gray Nylon Bristles
Specialized Design: Unique brush crafted exclusively for Chemex coffeemakers, with a distinct X-shaped bristle pattern ideal for cleaning…
As an affiliate, we earn on qualifying purchases.
As an affiliate, we earn on qualifying purchases.
Tune the cup without overcomplicating the ritual.
The moka pot was popularized in 1930s Italy and still thrives because it is simple, durable, and adaptable across gas, electric, and suitable induction setups.
Flavor Levers
Change one variable at a time so you can taste the difference clearly.
- Use freshly ground beans for more aroma and cleaner flavor.
- Try pre-warmed water to shorten contact time and reduce harshness.
- Pull the pot from heat as soon as hissing turns into gurgling.
Durability Levers
Maintenance protects both flavor and the pressure system.
- Rinse with warm water after brewing and dry before reassembly.
- Avoid routine soap use because residue can affect taste.
- Use a monthly vinegar soak for mineral buildup when needed.
Where the brew should land.
Use these ranges as a practical sensory guide. The ideal moka pot cup is rich, aromatic, and full-bodied, without burnt edges or watery thinness.
Small setup choices become cup quality.
Each step has a direct consequence. When the brew tastes wrong, walk backward through the chain instead of guessing.
The five habits of a reliable moka pot routine.
Keep the process steady and the pot clean, and your stovetop becomes a compact espresso bar whether you are on-grid or off-grid.
Measure
Fill water to the safety valve every time. No more, no less.
Grind
Use fine coffee similar to espresso grind, but avoid powdery clogging.
Level
Smooth the basket surface gently and skip tamping completely.
Listen
Remove the moka pot from heat as soon as the gurgle begins.
Rinse
Clean with warm water after each use and treat minerals with vinegar.
Adapt
For induction, choose magnetic stainless steel or use an induction disc.
Know Your Moka Pot Inside and Out for Better Brews
Understanding the parts of your moka pot is like knowing the anatomy of a good shot. The bottom chamber holds water, ready to turn into steam. The filter basket is where you load your coffee grounds. The upper chamber collects your brewed espresso. And don’t forget the safety valve, a crucial safety feature that prevents pressure buildup.
Imagine trying to make a perfect shot without knowing these parts—like trying to play a guitar without knowing the strings. Spend a few minutes familiarizing yourself with each piece. That way, assembly and troubleshooting become second nature, and you’ll brew with more confidence.
Knowing these components deeply helps you understand the brewing process itself. For instance, understanding how the safety valve works allows you to recognize potential issues before they become dangerous, such as excessive pressure buildup indicating a clogged or improperly assembled pot. This knowledge enables proactive maintenance and adjustments, ultimately leading to more consistent and higher-quality coffee.
Pick the Perfect Coffee and Grind for Rich, Bold Flavor
The secret to a great moka pot espresso starts with finely ground coffee, similar to what you’d use in a professional espresso machine. Too coarse, and you’ll get weak, watery coffee. Too fine, and it might clog the filter or cause overpressure.
For a typical 3-cup moka pot, use about 18-20 grams of coffee—roughly a level tablespoon per cup. Avoid pressing down or tamping; just level it off gently. Freshly ground beans will give you more vibrant flavors, especially if you grind just before brewing.
Choosing the right grind size isn’t just about flavor; it also impacts the pressure buildup inside your moka pot. Too fine a grind increases resistance, risking overpressure and leaks, while too coarse leads to under-extraction and weak coffee. Experimenting with grind size helps you strike a balance, optimizing flavor without risking damage or inconsistent results. The tradeoff is that finer grinds may clog the filter over time, requiring more frequent cleaning, while coarser grinds may need longer brewing times. Understanding these nuances allows you to tailor your process for the best possible cup.
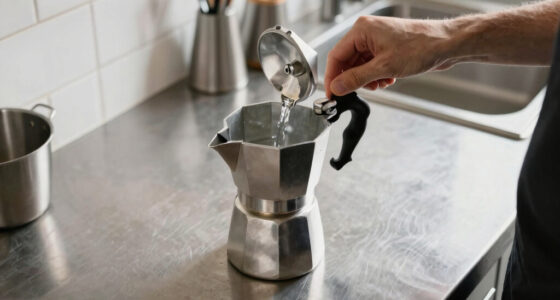
Fill with Water the Right Way — No Overflows or Weak Brews
Pour cold water into the bottom chamber up to the safety valve level. That’s the line where water should reach without overflowing when heated. Use a small measuring cup or eyedropper for precision. Overfilling can cause water to bubble over and mess up your brew. Underfilling leads to weak coffee.
Imagine the water as the fuel for your espresso—too much and it overflows, too little and it’s underpowered. Always check the level before screwing on the top.
Proper water level is essential because it directly influences the pressure and extraction process. Too much water means the water takes longer to heat, reducing the pressure needed for proper extraction, leading to a diluted or weak brew. Conversely, too little water can cause rapid boiling and over-extraction, resulting in a bitter taste or even damage to the safety valve. The key is consistency; by always filling to the same level, you ensure predictable results and avoid potential hazards.
Assemble Your Moka Pot Like a Pro in 3 Simple Steps
- Insert the filter basket into the bottom chamber. Make sure it sits snugly and is aligned properly.
- Fill the filter basket with your ground coffee, leveling it off without tamping. Clean excess grounds from the rim to ensure a tight seal.
- Screw on the upper chamber firmly, threading it clockwise until it’s tight but not over-tightened, which can damage threads or cause leaks.
Think of assembly like putting together a puzzle—every piece needs to fit perfectly for the brew to come out right. Proper assembly ensures even water flow, prevents leaks, and maintains safety during brewing. If the parts aren’t aligned correctly or are over-tightened, it can cause uneven pressure buildup or damage the threads, leading to leaks or dangerous failures. Taking the time to assemble carefully, ensuring a tight but not forced fit, is a small step with big implications for your coffee quality and safety.
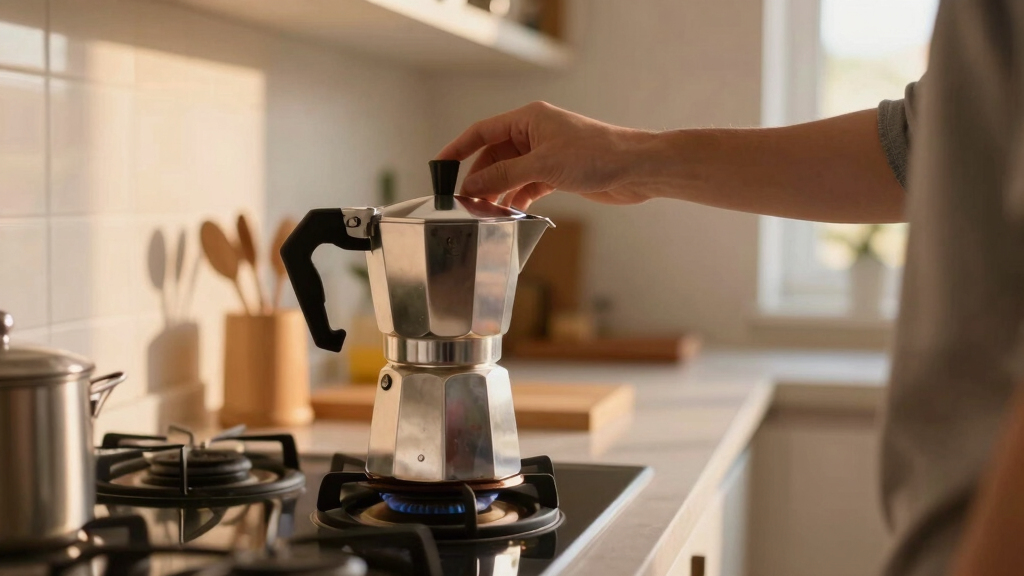
Brewing Your Coffee — How to Get It Perfect Every Time
Place your moka pot on the stove over medium heat. Keep the dial between low and medium — too hot and you risk burning the coffee or causing overpressure. As the water heats, steam builds up, forcing water up through the coffee grounds.
Listen carefully: a hissing or gurgling sound signals brewing is almost done. When you hear that, remove the pot from heat immediately. The water has passed through the coffee, and brewing is complete.
Imagine this as the moment when the rich aroma fills your kitchen — that’s how you know it’s ready. The timing and temperature control are crucial because they determine the extraction quality. Too high a heat can cause bitter, over-extracted flavors, while too low may result in under-extraction, lacking depth and richness. The key is to find that sweet spot where the pressure is enough to push water through the grounds efficiently without burning or over-pressurizing the system. Developing this sense of timing and temperature control helps you consistently produce flavorful, well-extracted espresso.
Pour, Enjoy, and Clean — Keep Your Moka Pot Happy
Pour your freshly brewed espresso into a cup. Be careful; the moka pot will be hot. Use a pot holder if needed. Enjoy that bold, dark brew with its rich aroma and full-bodied flavor.
Cleaning is simple — disassemble the pot and rinse all parts with warm water. Avoid soap unless you want to affect flavor. For mineral buildup, a vinegar soak once a month keeps things running smoothly.
Remember: a clean moka pot brews better coffee and lasts longer. Regular cleaning prevents mineral deposits and coffee residue from affecting flavor, and it reduces the risk of clogging or damaging the safety valve. Neglecting this step can lead to off-flavors, inconsistent brewing, and even safety hazards over time. Making cleaning part of your routine preserves the integrity of your equipment and ensures each cup tastes as good as the first.
Troubleshooting Common Problems — Fix Your Brew Fast
Leaking or overflowing? Check if the assembly is tight and the coffee grind isn’t too fine. Bitter or weak coffee? Adjust the grind size or brewing heat. Clogged or slow brewing? Clean the safety valve and check for mineral deposits.
For example, if your coffee tastes burnt, try lowering the heat and using fresher, coarser grounds. Small adjustments make a big difference in flavor. Recognizing these issues early and understanding their causes helps you troubleshoot effectively. For instance, leaks often indicate over-tightening or improper assembly, while bitter flavors point to over-extraction from fine grinds or excessive heat. Slow brewing can be due to mineral buildup or a clogged safety valve. Learning to interpret these signals empowers you to maintain your moka pot proactively, ensuring consistent, high-quality results with minimal frustration.
Keep notes on what works best, like a barista refining their shot.
Latest Tips and Tricks for Better Moka Coffee
Pre-warm your water to reduce brewing time and preserve flavor. Experiment with different coffee roasts—dark, medium, or light—to find what suits your taste. Use a scale for precise measurements, especially if you want consistency.
Some enthusiasts swear by a quick rinse of the filter before loading grounds to prevent clogs. Others experiment with slightly coarser grind for a smoother shot. These small tweaks can elevate your home espresso game.
Implementing these tips allows you to fine-tune your brewing process. Pre-warming the water ensures a more consistent temperature, which can improve extraction. Trying different roasts helps you discover the flavor profile that best suits your palate. Using a scale guarantees consistent dosing, reducing variability between brews. These incremental adjustments, though subtle, can significantly enhance your coffee’s complexity and richness, bringing your moka pot experience closer to professional standards. The tradeoff is that experimenting requires patience and careful note-taking, but the payoff is a more satisfying, customized brew every time.