TL;DR
Prime for Young Adults — start your free trial
Fast free delivery, streaming and member deals for eligible 18–24 year olds.
Try it freeAs an affiliate, we earn on qualifying purchases.
Creating a natural nonstick layer on cast iron involves applying very thin coats of oil and baking at high heat to form a durable polymerized film. Regular use and proper maintenance strengthen this layer over time, making your cookware genuinely nonstick.
Ever wondered why some cast iron pans develop a slick, almost magical nonstick surface while others stay sticky or rust-prone? The secret is in the seasoning process — not just slapping on oil, but building a tough, polymerized layer that bonds to the iron. This isn’t a quick fix; it’s a craft.
In this guide, you’ll learn how to create and maintain a natural nonstick coating that lasts for years. We’ll break down the science, share proven techniques, and bust common myths. Whether you’re starting fresh or fixing up an old pan, this is your roadmap to truly seasoned, dependable cookware.
Build up your seasoning with multiple thin layers of high-smoke point oil, baked at 450–500°F for best results.
Thin coats are key — too much oil leads to sticky, uneven surfaces; patience and precision matter.
Choose durable oils like grapeseed or canola for a long-lasting nonstick layer, not flaxseed if flaking is a concern.
Regular cooking with fats, immediate drying, and wiping a light oil film after washing strengthen the seasoning over time.
Soap is okay in moderation; total stripping is only necessary for severe rust or damage.
How to Build Up a Natural Nonstick Layer
The slick, dark patina on great cast iron isn’t grease — it’s a polymerized film, chemically bonded to the metal itself. Built from whisper-thin coats of oil baked past their smoke point, this layer turns raw iron into genuinely nonstick, rust-resistant cookware that improves for decades.
450–500°F
Oven Temperature
Heat must exceed the oil’s smoke point (230–260°C) to trigger cross-linking.
2–4 coats
Base Layer Repetitions
Each ~1 hour bake adds one bonded film; multiple passes build durability.
1 drop
Oil Per Coat (Roughly)
Rub in, then wipe back off until the pan looks almost dry. Excess = sticky.
~400°F
Canola Smoke Point
~420°F
Grapeseed Smoke Point
60min
Bake Time Per Coat
∞
Times It Can Be Rebuilt
01 · The Chemistry
What Exactly Is a Natural Nonstick Layer?
It’s not a greasy film sitting on top of the metal. When unsaturated oil is heated past its smoke point on bare iron, the fat molecules break down and cross-link into a hard, plastic-like coating — a skin that is chemically bonded to the pan.
Polymerization, Not Greasing
Think of seasoning as building a brick wall: each micro-thin coat of oil is one brick, cured solid by high heat before the next is laid. The result is a slick, dark patina that makes eggs slide, pancakes flip, and bacon crisp — while shielding the iron from rust.
Neglect it, or flood it with oil, and you get weak spots: gummy patches, flaking, sticky blotches. Discipline and thin layers are the entire craft.
The polymerization chain — fat to plastic-like film
Smoke Points vs. Baking Temp
02 · The Method
Build a Strong Coating in 4 Simple Steps
The core technique is identical whether you’re starting a fresh pan, improving a factory “pre-seasoned” Lodge, or resurrecting a rusty flea-market find.
Wash & Dry Completely
Hot water and a stiff brush (steel wool for rust or old flaking). Then heat on the stovetop until every trace of moisture evaporates — water is the enemy of bonding.
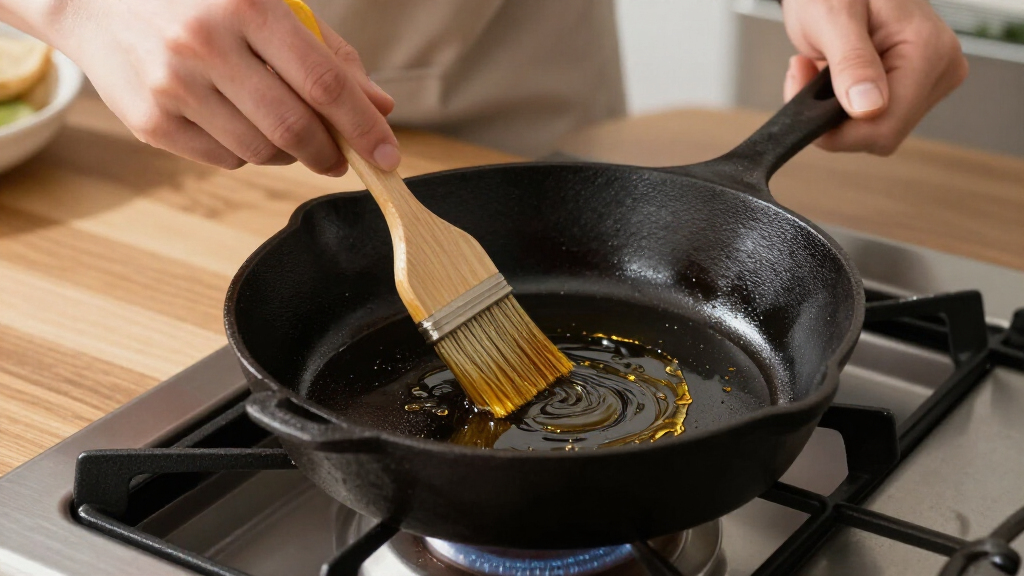
Rub a Tiny Amount of Oil
A thin coat of high-smoke-point oil over the entire pan, inside and out. Then wipe it back off as if you want it all gone. It should look nearly dry.
Bake Upside Down, 450–500°F
One hour in a preheated oven, pan inverted, foil on the rack below to catch drips. Let it cool inside the oven. This is where polymerization happens.
Repeat 2–4 Times
Each pass adds thickness and durability. Restoring an old pan? Extra thin coats rebuild a smooth, reliable surface from a flaky one.
03 · Material Selection
Choosing the Right Oil
Oil choice determines how hard, flexible, and long-lasting your seasoning becomes. Building a base layer with perishable or low-smoke-point fats is like building a wall from materials that rot.
| Oil / Fat | Smoke Point | Film Character | Notes | Verdict |
|---|---|---|---|---|
| Grapeseed | ~420°F (216°C) | Hard, flexible, durable | The dependable brick — forgiving and long-lasting | ✓ Top Pick |
| Canola / Vegetable | ~400°F (204°C) | Durable, even | Cheap, consistent, the traditional standard | ✓ Top Pick |
| Crisco (shortening) | ~360°F (182°C) | Hard, resilient | Old-school favorite; bake hotter than its smoke point | ✓ Good |
| Flaxseed | ~225°F (107°C) | Hardest — but brittle | Canter’s viral method; widely reported flaking over time | ~ Debated |
| Olive Oil | ~375°F (190°C) | Soft, uneven | Low performance for base layers | ✗ Avoid |
| Butter / Animal Fats | ~300°F (149°C) | Tacky, can go rancid | Fine for cooking — not for building the base layer | ✗ Avoid |
Highlighted rows = recommended base-layer oils · ✓ recommended · ~ situational · ✗ avoid
04 · Myth-Busting
Soap, Stripping & Re-Seasoning
Most seasoning folklore dates to a different era of chemistry. Here’s what actually harms the layer — and what doesn’t.
“Never let soap touch cast iron”
✗ False. The rule dates to lye-based soaps that genuinely stripped seasoning. ✓ Modern mild dish soap won’t touch a polymerized layer — like gentle soap on a car’s clear coat. What actually harms it: soaking, dishwashers, and steel wool on bare spots.
“Acidic foods destroy the pan”
✗ Mostly false. Tomato sauce or wine reductions can strip young seasoning, but a well-established patina handles brief acidic cooking fine — it can even lift minor buildup. Just avoid long acidic simmers early on.
“Rust means the pan is ruined”
✗ False. Scrub to bare metal with steel wool or vinegar, then re-season with thin coats and high heat. ✓ Seasoning is infinitely renewable — that renewability is cast iron’s core selling point.
Total stripping: the full redo
Reserved for severe rust or damage only. Options: self-cleaning oven cycle, lye-based oven cleaner, or electrolysis. Then rebuild from bare metal like repainting a worn wall — thin coats, high heat, patience.
05 · The Long Game
Maintain & Improve the Layer Over Time
Seasoning isn’t static — it’s a living coating that degrades and rebuilds with every use. A base layer gets you eggs; true slickness takes weeks to months of regular cooking. Tend it like a garden.
Cook With Fat, Often
Bacon, fried foods, cornbread — every fatty cook deposits new polymerized material onto the surface. Especially in the first weeks, cooking is seasoning.
Dry Immediately + Oil Film
After washing, dry at once (stovetop heat is fastest), then wipe on a tiny film of oil — like applying a protective wax. Small, consistent applications, never a thick layer.
Clean Gently
Skip harsh abrasives on a healthy patina; a chainmail scrubber handles stuck bits without stripping. Aggressive scouring is sanding down a painted surface.
06 · The Full Chain
From Bare Iron to Everyday Nonstick
Bare Iron
Cleaned, fully dried, free of rust and debris
Thin Oil Coat
Grapeseed or canola, wiped nearly dry
450–500°F Bake
One hour, upside down — polymerization
Repeat ×2–4
Layer upon bonded layer builds the base
Living Patina
Everyday cooking keeps it slick for years
What Exactly Is a Natural Nonstick Layer Anyway?
A natural nonstick layer is a thin, hard coating formed by polymerized oil on cast iron. Unlike a greasy film, it’s a chemical cross-linking of fat molecules that creates a slick, durable surface. Think of it as a plastic skin for your pan, built from repeated layers of heat-processed oil.
This layer is what makes eggs slide, pancakes flip, and bacon crisp without sticking. It’s also what makes your pan rust-resistant and easier to clean over time.
Understanding this layer’s chemistry is crucial because it highlights why proper seasoning is a long-term investment. The more you cook and maintain this layer, the thicker and more effective it becomes—much like a protective armor that improves with use. Conversely, neglecting it or applying too much oil can create weak spots or sticky patches, undermining its effectiveness.
As an affiliate, we earn on qualifying purchases.
How to Build a Strong, Nonstick Coating in 4 Simple Steps
- Wash and dry the pan thoroughly. Use hot water and a stiff brush or steel wool to remove old seasoning, rust, or debris. Dry it completely — a quick stovetop heat can evaporate residual moisture. This step ensures a clean surface, free of contaminants that can interfere with bonding.
- Apply a tiny amount of oil. Rub a very thin coat of high-smoke point oil (like grapeseed or canola) all over the surface, inside and out. Wipe off the excess until the pan looks nearly dry. Think of this as laying a foundation—too much oil can cause uneven buildup, leading to sticky patches or flaking.
- Bake the pan upside down at 450–500°F. Place it in a preheated oven with foil below to catch drips. Bake for about an hour, then let it cool inside the oven. This controlled heat causes the oil to undergo polymerization—a chemical transformation that forms the durable nonstick layer.
- Repeat 2–4 times. Each layer adds to the coating’s thickness and durability. For example, if you’re restoring an old pan, multiple thin coats can help rebuild a flaky or uneven surface, resulting in a smoother, more reliable nonstick layer.
Consistency matters. Each coat should be as thin as a film of water. Excess oil can result in a sticky, gummy surface, especially if not baked thoroughly. Patience and precision here are key—think of it like painting: multiple thin coats build a stronger, more uniform finish.
high smoke point cooking oil for cast iron
As an affiliate, we earn on qualifying purchases.
As an affiliate, we earn on qualifying purchases.
Why Thin Coats Matter More Than You Think
Applying too much oil or baking at too low a temperature results in sticky, blotchy seasoning—think of it like pouring thick paint that never dries evenly. Thin, even coats dry faster, bond better, and form a smoother, more resilient nonstick surface. For example, if you’ve ever noticed a pan with patches that feel gummy or flakes that chip off, it’s often because of excess oil or insufficient heat during seasoning.
Think of seasoning like building a brick wall: each brick (layer of oil) must be carefully placed and thoroughly set before adding the next. Too many bricks stacked unevenly create a wobbly structure. Similarly, thick or uneven oil layers lead to weak spots that can trap food or cause rust. Achieving a glassy, hard finish—similar to a well-polished ceramic—requires disciplined thin layers and high heat, which ensures the polymerization process is complete and the coating is durable.
As an affiliate, we earn on qualifying purchases.
Choosing the Right Oil for a Durable, Nonstick Finish
Oil selection influences how well your seasoning polymerizes and how long it lasts. Grapeseed, canola, vegetable oil, or Crisco are popular because they have high smoke points and form hard, resilient layers after baking. For example, using canola oil is like choosing a reliable, sturdy brick for your wall—consistent and dependable.
While flaxseed oil is often touted for its drying properties, it can produce a brittle, flaking surface if applied repeatedly or if layers aren’t baked thoroughly. Think of it like using a highly brittle glass: it can be very hard but also prone to cracking if not handled carefully. For most home cooks, sticking with oils that form a flexible, durable film—like grapeseed or canola—is safer and more forgiving.
Avoid butter, olive oil, or animal fats for your base layers because they tend to go rancid faster and may produce uneven coatings. Imagine trying to build a wall with materials that rot or warp over time—that’s what using low-smoke point or perishable fats can lead to in your seasoning.
As an affiliate, we earn on qualifying purchases.
How to Maintain and Improve Your Nonstick Layer Over Time
Seasoning isn’t static; it’s a living, breathing coating that improves with use. Think of it like a garden—regular watering and care lead to a lush, resilient surface. Cooking with fats like bacon or fried foods deposits new polymerized layers, much like fertilizing the soil to encourage healthy growth.
Dry your pan immediately after washing to prevent rust, then wipe a tiny amount of oil onto the surface. This routine is akin to applying a protective wax—small, consistent applications reinforce the coating without building up sticky layers.
Every time you cook, especially with fats, you add to this layer, making it thicker and more nonstick. Proper cleaning—avoiding harsh abrasives—is like pruning a plant: it keeps the surface healthy and prevents damage. Over time, these small daily practices result in a pan that is slick, rust-free, and more resistant to sticking, much like a well-maintained garden that flourishes with minimal intervention.
Myth-Busting: Soap, Stripping, and Re-Seasoning
Contrary to old advice, modern dish soap won’t ruin your seasoning. Mild soap can be used without stripping the polymerized layer, much like washing a car with gentle soap won’t damage the clear coat. Only aggressive scrubbing or dishwashers with harsh detergents can harm the seasoning, akin to sanding down a painted surface.
For a total redo, stripping options include self-cleaning oven cycles, oven cleaner, or electrolysis—methods that effectively remove all seasoning and rust. Once stripped, re-season with thin oil layers and high heat, much like repainting a worn wall. This process restores a fresh, smooth surface.
Acidic foods like tomato sauce generally won’t ruin a well-established seasoning—think of them as natural cleansers that can even help remove minor buildup. However, cooking highly acidic dishes for extended periods early in the seasoning process can break down the oil layer, similar to how prolonged exposure to harsh chemicals can weaken paint. Being mindful of this helps maintain a strong, durable seasoning over time.
Frequently Asked Questions
Can I use any oil for seasoning, or does it have to be special?
Any high-smoke point oil like grapeseed, canola, or vegetable oil works well. Choose one that’s affordable and reliable. Flaxseed can produce a hard layer but may flake or crack for some users.How many seasoning layers do I need before my pan is truly nonstick?
Typically, 3 to 4 thin layers are enough to start. The nonstick quality improves with continued use and seasoning, often taking weeks of regular cooking to reach peak slickness.Is it okay to wash my cast iron with soap?
Yes. Modern mild dish soap won’t ruin your seasoning. Just avoid harsh abrasives or soaking for long periods. Wipe it dry and apply a light oil film afterward to maintain the coating.What do I do if my pan is sticky or gummy after seasoning?
It usually means too much oil or not enough heat. Strip the pan, then repeat the seasoning process with very thin coats and high oven temperatures. Consistency is key to achieving a smooth, durable nonstick surface.Can I fix rusted cast iron easily?
Yes. Use steel wool or vinegar to scrub off rust, then re-season the pan thoroughly. Rust is fixable, and the seasoning layer can be rebuilt repeatedly—think of it as restoring a worn but salvageable surface.Conclusion
Seasoning your cast iron isn’t about quick fixes; it’s about building a sturdy, polymerized shield that improves with each use. Patience, thin layers, and high heat are your best tools. Over time, your pan becomes a trusted partner in your kitchen, slick and ready for anything.
Remember: good seasoning is a practice, not a one-time project. Treat your pan with respect, and it will reward you with a lifetime of dependable nonstick performance.
NFL season / tailgating Picks
team gear
As an affiliate, we earn on qualifying purchases.