
TL;DR

Get kitchen gear delivered free — and shop member deals
- Fast, free delivery on millions of items
- Access to Prime Big Deal Days deals on October 6–7
- Prime Video, Amazon Music and more included
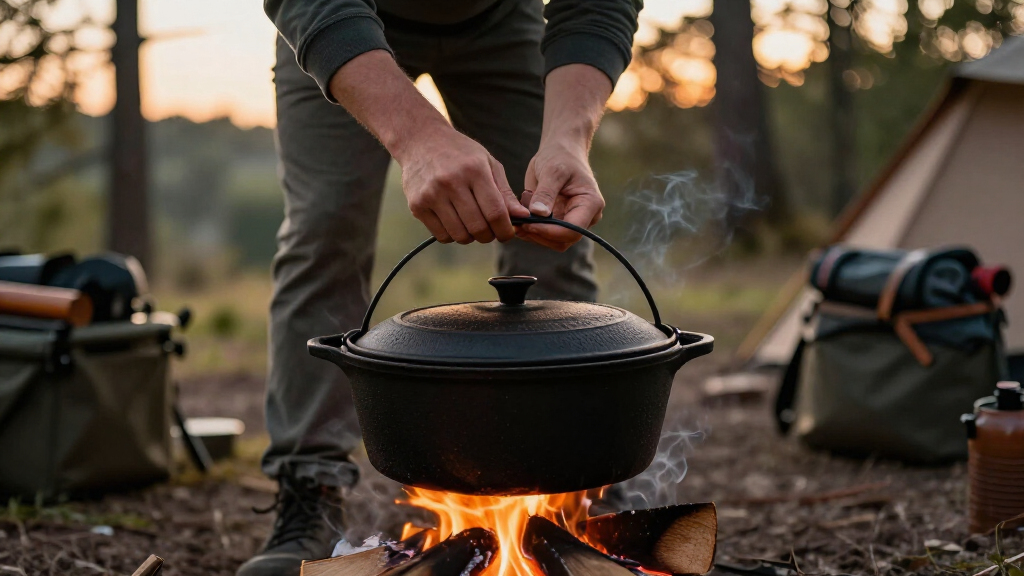
Baking in a camp Dutch oven hinges on controlling heat from above and below, using the right tools, and adjusting for outdoor conditions. With practice, you can produce everything from bread to cakes right over the fire.
Trying to bake in the wild might sound like a recipe for disaster. Yet, with a little know-how, your camp Dutch oven can become a reliable baking partner. No fancy kitchen gadgets, just good cast iron, a steady fire, and some basic techniques.
This guide walks you through everything—heat management, tools, common mistakes—so you can turn simple ingredients into fresh bread, cakes, and more, all in the great outdoors.
Use about one-third of your coals underneath and two-thirds on top for balanced heat.
Rotate the oven and lid every 10–15 minutes to avoid hot spots and uneven baking.
Line the oven with parchment or liners to prevent sticking and simplify cleanup.
Avoid opening the lid too often—each peek releases precious heat.
Choose a quality, appropriately sized cast iron Dutch oven for consistent results.
How to Bake in a Camp Dutch Oven
Turn cast iron, steady coals, and a little patience into an outdoor oven. The essentials are simple: put most of the heat on the lid, rotate regularly, protect the bake from hot spots, and let the oven stay closed.
Build an oven, not a bonfire
Baking needs enveloping heat. A ring of coals below protects the center from scorching, while evenly spread lid coals brown the top and cook the interior.
The 350°F coal plan
12-inch cast ironPlace in a ring near the perimeter—not directly beneath the center.
Distribute evenly across the lid, keeping some heat near the outer edge.
Six moves from setup to serving
Outdoor baking becomes predictable when every tool, ingredient, and heat adjustment is ready before the coals are lit.
Prepare
Measure ingredients and gather tools before lighting fuel.
Light
Ignite enough briquettes for the target heat, plus replacements.
Preheat
Warm the oven briefly for bread, biscuits, and pizza.
Load
Add the food, then arrange one-third below and two-thirds above.
Rotate
Turn pot and lid in opposite directions to cancel hot spots.
Test
Judge doneness by sight, touch, sound, and temperature.
Tools that remove the guesswork
A few purpose-built tools improve control, prevent burns, reduce sticking, and make delicate bakes far more forgiving.
Lid lifter
Moves the hot lid safely and helps keep ash away from the food. Lift straight up whenever checking the bake.
Long metal tongs
Add, remove, and reposition briquettes while keeping hands away from sparks and radiant heat.
Instant-read thermometer
Confirms internal doneness when outdoor temperatures make recipe timing unreliable.
Parchment or liner
Reduces sticking and cleanup for cobblers, cakes, and sugary foods. Keep liners inside the rim.
Trivet or small rack
Creates an air gap below the baking pan, reducing direct heat and protecting delicate bottoms.
Fire-safe windscreen
Limits rapid heat loss and uneven burning while maintaining adequate ventilation around the coals.
Cast iron earns its weight
Aluminum is attractive for travel, but heat-retaining cast iron offers the steadier environment most bakers need.
| Factor | 12″ Cast Iron | Aluminum | Best decision |
|---|---|---|---|
| Heat retention | ✓Excellent and steady | ~Fast to heat and cool | Cast iron for consistent baking |
| Weight | ~Heavy | ✓Much lighter | Aluminum for weight-sensitive trips |
| Rust resistance | ~Requires seasoning | ✓Naturally resistant | Aluminum needs less maintenance |
| Heat forgiveness | ✓Slow, even response | ~Quick temperature swings | Cast iron for bread and cakes |
| Ideal setting | Car camp or base camp | Backpacking or light travel | Choose for trip style and load |
Read the conditions, then adjust
Coal counts are a starting point—not a thermostat. Watch how the fuel behaves and correct early rather than waiting for the bake to fail.
Protect steady heat
Wind accelerates burning while pulling warmth away from the oven. Cold ground and heavy food loads also slow the bake. Keep replacement coals ready and replenish fading fuel before the temperature collapses.
Never use charcoal inside a tent, vehicle, cabin, or enclosed shelter. Burning charcoal produces deadly carbon monoxide.
Fix the bake before it burns
Most failures trace back to coal placement, excessive checking, weak fuel, or an oven that was never protected from the weather.
Why is the bottom burning?
There are too many coals below or they sit under the center. Move them outward, reduce bottom heat, and use a trivet or internal pan.
Why is the top still pale?
Add a few fully lit coals to the lid and redistribute them evenly, with attention to the outer edge.
Can campfire embers replace briquettes?
Yes, but hardwood embers are less uniform. Use glowing, steady coals rather than flames and keep replacements ready.
Should the oven be preheated?
Preheat for bread, biscuits, and pizza. Cobblers and casseroles can start cold, though they may require more time.
How often should the lid be opened?
As little as possible. Each peek releases accumulated heat. Remove lid coals first, then lift straight up to avoid falling ash.
How do I judge doneness?
Bread should brown and sound hollow, cakes should spring back, and casseroles should bubble. Confirm with a thermometer when needed.
Control beats luck
Pick the Perfect Dutch Oven for Your Camping Needs
Choosing the right camp Dutch oven sets the foundation for successful baking. A 12-inch cast iron oven hits the sweet spot—big enough for family-sized dishes, durable enough for outdoor use. It has three sturdy legs, a flat lid with a raised rim, and a wire bail handle for easy handling over hot coals.
While aluminum ovens are lighter and resist rust, they heat faster and cool quicker—less forgiving for baking. Cast iron, though heavy, retains heat evenly, making it ideal for consistent results. Your choice depends on how much weight and fuss you’re willing to manage.
For example, if you’re backpacking, a lighter aluminum model might be tempting. But for car camping or base-camp baking, a sturdy 12-inch cast iron oven is the way to go.
As an affiliate, we earn on qualifying purchases.
Control the Heat: The Key to Perfect Baked Goods
Heat control in outdoor baking is about balancing hot coals above and below. A good rule of thumb is to use roughly one-third of your briquettes underneath and two-thirds on top. This ratio influences how evenly heat is distributed inside the oven, which is crucial for baking success. Too much heat from below can cause burning or a burnt crust before the interior is cooked, while too much from above can lead to overly browned tops or scorched surfaces. Managing this balance allows the heat to circulate more like a conventional oven, leading to more predictable results.
This ratio prevents burning the bottom while ensuring the top browns properly. Place bottom coals in a ring around the perimeter, not directly under the center. Spread lid coals evenly, with some near the edges for consistent heat.
Imagine baking a loaf of bread. Too much heat underneath causes the crust to burn or form prematurely, while the inside remains undercooked. Proper placement creates a gentle, oven-like environment, even in the woods. Adjusting coal placement based on the specific recipe and conditions can mean the difference between a perfect loaf and a disappointing one.
As an affiliate, we earn on qualifying purchases.
Use the Right Tools to Make Baking Easier
Having the proper tools makes outdoor baking safer and more precise. A sturdy lid lifter helps you add or remove coals without burns, and long tongs keep your hands safe from sparks. An instant-read thermometer is invaluable for checking internal doneness—breads should sound hollow, cakes spring back, and casseroles bubble.
Line your oven with parchment or reusable liners for sticky baked goods, and place a small rack or trivet inside to prevent scorching. These simple additions turn your Dutch oven into a mini oven within an oven, giving you better control and cleaner cleanup.
For example, a cake baked on a rack inside the Dutch oven rises evenly without sticking or burning on the bottom. Using these tools reduces guesswork and helps you monitor progress more accurately, leading to more consistent results.
outdoor baking tools for Dutch oven
As an affiliate, we earn on qualifying purchases.
As an affiliate, we earn on qualifying purchases.
Avoid Common Mistakes That Ruin Your Bake
Many outdoor bakers stumble because they ignore critical details. Equal heat above and below often leads to burnt bottoms or raw tops. Placing too many coals directly under the center causes scorching, while not rotating the oven allows hot spots to develop. Recognizing and adjusting for these issues can save your bake from failure. For example, if you notice the bottom browning too quickly, move the coals outward or reduce the number underneath. If the top isn’t browning enough, add more coals to the lid or reposition them for more direct heat.
Opening the lid too often lets heat escape—wait until the expected finish time to check. Ash inside the lid or on the food surface causes bitterness and mess. Using weak or unlit coals means the oven never reaches the right temp. Weather conditions, such as wind, can cool coals quickly, so shielding your oven with a windbreak helps maintain consistent heat. Finally, avoid cooking sugary or acidic foods in unseasoned or poorly maintained cast iron, which can cause sticking or rusting. Regularly cleaning and seasoning your cast iron enhances its heat retention and non-stick qualities, leading to better baking outcomes.
As an affiliate, we earn on qualifying purchases.
Step-by-Step: Your Easy Baking Workflow in the Wilderness
- Prepare your recipe and gather all tools before lighting coals. Think ahead—mise en place saves time and fuss.
- Light enough briquettes to reach your target temperature, plus extras for maintaining heat.
- If preheating is needed, place hot coals above and below for a few minutes, then add your food carefully.
- Arrange about one-third of coals underneath and two-thirds on top. Position the oven on a fire-safe surface, shield from wind.
- Place the lid back on, rotate the oven and lid every 10–15 minutes. Replenish fading coals early to keep a steady temperature.
- Check doneness by sight and touch—breads should sound hollow, cakes spring back, casseroles bubble. Use a thermometer for safety.
- Remove the coals from the lid before opening, then lift out your baked goods with appropriate tools.
This routine makes outdoor baking predictable, even in unpredictable conditions.
Frequently Asked Questions
How many coals do I need for 350°F?
For a 12-inch cast-iron camp oven, about 8 coals underneath and 16–17 on top typically produce around 350°F. Adjust based on weather, fuel, and your specific oven—it’s a starting point, not a rule set in stone.
Can I use campfire coals instead of charcoal?
Yes, hardwood embers work, but they are less uniform and harder to measure. Use glowing, steady coals rather than active flames, and keep extras ready to maintain temperature through longer cooks.
How long do briquettes last?
Most briquettes provide about 45–60 minutes of good heat, but weather, briquette quality, and placement matter. Plan for extra coals if your bake takes longer, and add them early to keep steady heat.
Should I preheat my Dutch oven?
Preheating helps with breads, biscuits, and pizzas that need a quick start. For casseroles or cobblers, starting cold is fine—just plan for longer cooking times and monitor carefully.
Why does my food burn on the bottom?
Usually because of too many bottom coals or placement directly under the center. Move coals toward the perimeter, use a trivet or baking pan, and reduce direct bottom heat to prevent scorching. Recognizing the cause helps you adjust your setup for better results, saving you from burnt edges or undercooked centers.
Conclusion
Mastering Dutch oven baking outdoors is less about luck and more about control. Focus on managing heat, using the right tools, and staying patient. Your next loaf or cake in the wild will taste just as good as from your kitchen—maybe even better, because it’s made with your own hands and fire.
Remember, every good baker learns from mistakes. Keep experimenting, stay attentive, and let the outdoors inspire your baking adventures.
Fall Picks
fall essentials
As an affiliate, we earn on qualifying purchases.