
TL;DR

Get kitchen gear delivered free with Prime
- Fast, free delivery on millions of items
- Prime Video, Amazon Music and more included
- Member-only deals all year
To dehydrate herbs and keep their flavor, harvest dry, healthy leaves, use gentle heat and steady airflow, and dry them until leaves crumble and stems snap. Cool them fully, store them whole in airtight containers away from light and humidity, and crush only what you need when you cook.
Harvest dry, healthy leaves after dew dries and before flowering when practical.
Rinse herbs only if needed, then dry off surface water thoroughly.
Use low heat, good airflow, and uncrowded trays; many dehydrators run herbs around 95–115°F (35–46°C).
Store only fully cooled, crisp herbs in airtight containers away from light, heat, and humidity.
Keep leaves whole, label the drying date, and crush a small amount just before cooking.
Kitchen Field Guide / Preserve the Harvest
How to Dehydrate Herbs and Keep the Flavor
Pick dry, healthy leaves, then use gentle heat and steady airflow. Let texture—not the timer—tell you when they are ready. Cool completely, store whole in an airtight jar, and crush only what you need.
01 / Start well
Small choices protect big aroma
Clean, dry leaves are easier to dry evenly. Begin with a healthy harvest and keep extra moisture out of the process.
Harvest timing
Pick after dew
Choose healthy, unblemished leaves once morning dew has dried. Harvest before flowering when practical, when aromatic oils are often strongest.
Rinse only if needed
Dry the surface
Use a brief cool rinse to remove grit. Shake off water and pat dry thoroughly; soaking or bundling wet herbs adds drying time.
Keep kinds distinct
Sort the harvest
Separate herbs with different scents and drying rates. Remove bruised, yellow, or damaged leaves before they reach the tray.
Tender / handle gently
Basil · Cilantro · Parsley · Mint
Sturdy / easier to air-dry
Rosemary · Thyme · Oregano · Sage
02 / Choose your setup
Match the method to the batch
Air movement matters in every method. Leave room around leaves and sprigs so moisture can escape.
| Method | Best fit | Watch for |
|---|---|---|
| Dehydrator | Mixed harvests and repeatable drying | Follow appliance guidance; leave space around sprigs. |
| Air-drying | Small bunches of rosemary, thyme, oregano, or sage | Humidity, dust, and tightly packed bundles. |
| Low oven | A small batch when the oven can run gently | Excess heat and trapped moisture; check often. |
Hang
Loose bunches
Tie small bunches by the stems and hang upside down in a dark, dry, well-ventilated place. Split any bundle whose center is hidden.
Spread
Single layer
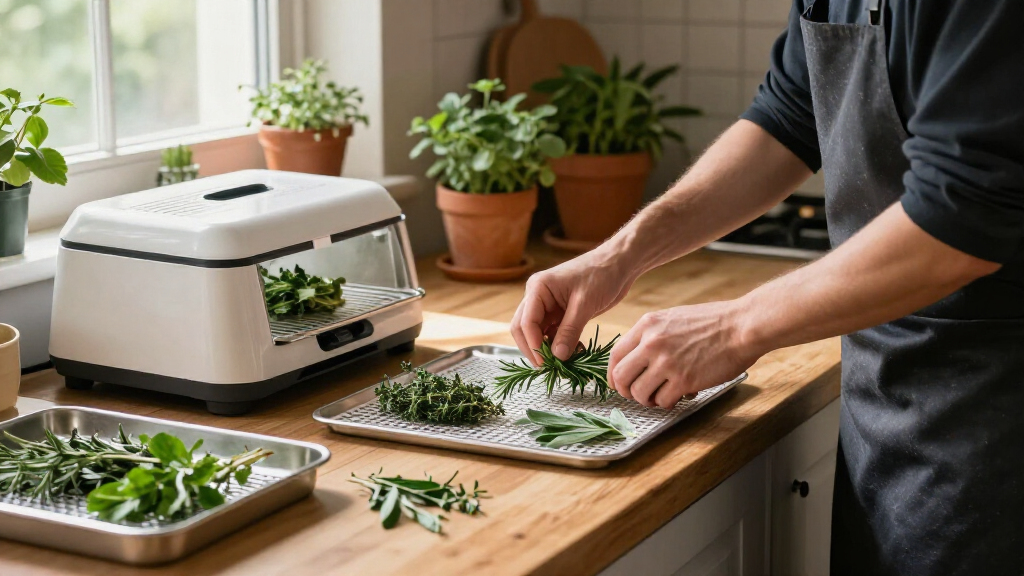
Use uncrowded dehydrator trays or a clean mesh screen in a protected, ventilated area away from sun, smoke, and pets.
Check
Oven with care
Use the lowest setting only if it stays gentle and moisture can escape safely. Avoid this method for tender leaves if the oven runs hot.
03 / Protect the oils
Gentle heat. Uncrowded airflow.
Strong heat can drive off the volatile oils that carry aroma. Follow your appliance instructions and check the herbs as they dry.
Common dehydrator setting
95–115°FAbout 35–46°C. The right setting depends on the herb, leaf size, room humidity, and appliance. Use its manual as your guide.
04 / Readiness check
Dry means crisp all the way through
Drying may take a few hours in a dehydrator or several days by air. The thickest pieces set the pace.
Cool a sample
Warm leaves can disguise moisture. Let a sample reach room temperature before testing.
Rub a leaf
It should crumble readily between your fingers, not feel soft or leathery.
Snap the stem
Choose the thickest sprig. A clean snap means ready; a bend means keep drying.
Recheck overlaps
Inspect any crowded or overlapping pieces. Return damp areas to the rack or tray.
05 / Keep the fragrance
Store whole, cool, dark, and dry
Once fully crisp, let herbs cool completely. Then protect them from air, light, heat, and humidity.
Container
Airtight jar
Use a clean, completely dry container with a tight-fitting lid.
Placement
Cool & shaded
Keep jars away from sunlight, warm appliances, and damp air.
Use
Keep leaves whole
Label herb and drying date. Crush only the amount needed for cooking.
The flavor-preserving chain
From garden to jar
Each step makes the next one work better. Keep the chain simple and the herbs fragrant.
Harvest
Dry leaves
Pick healthy leaves after dew.
Prepare
Rinse if needed
Remove surface water thoroughly.
Dry
Low + airflow
Spread out; check texture.
Confirm
Crumble + snap
Cool fully before sealing.
Store
Whole + airtight
Keep away from light and damp.
Quick answers
Common drying questions
Conditions vary from kitchen to kitchen. These checks help you adapt without relying on a fixed timer.
How long does drying take?
It varies. A few hours in a dehydrator or several days by air; check for crisp leaves and brittle stems.
Can different herbs dry together?
Sometimes. Keep herbs with similar drying needs together, and separate strongly scented kinds to preserve distinct flavors.
Can I use a microwave?
It is less reliable. Microwaving is quick but easy to overdo, so drying may be uneven and flavor can suffer.
Why did flavor fade?
Common causes: excessive heat, air or light exposure, damp storage, or keeping herbs too long.
Harvest at the right time for a stronger, cleaner flavor
To dehydrate herbs and keep their flavor, pick healthy leaves after the morning dew has dried and before the plant flowers. Dry leaves carry less surface moisture, and pre-flowering plants often have strong aromatic oils; bruised, yellow, or wet leaves can dry unevenly and bring dull flavors into the jar. Walk through the garden with a clean basket in late morning, when the leaves feel dry but the sun has not baked them. Take only what you can process that day. If you bring in a damp handful of parsley after rain, spread it on a clean towel and let it air-dry before you decide whether it needs rinsing; every extra drop of water adds time before the leaves become crisp. Wash herbs only when they need it. A brief rinse in cool water removes grit, but soaking leaves or bundling them while wet leaves moisture trapped between stems. Shake off water, then pat the herbs dry with a clean towel. For a small harvest of mint with visible soil, this quick rinse-and-dry routine is more useful than skipping cleaning or leaving the leaves wet on the counter. Tender herbs such as basil, cilantro, parsley, and mint deserve especially gentle handling. Sturdier rosemary, thyme, oregano, and sage are generally easier to dry. Keep each kind in its own basket if you can; their smells are distinct, and mixed piles make it harder to spot a bruised leaf or judge how each herb is drying.Products Worth Considering

Ninja Crispi Glass Air Fryer (Stone) – 4‑in‑1

KitchenAid Artisan 5-Quart Tilt-Head Stand Mixer, Almond Cream

KitchenAid 8-Cup Grain and Rice Cooker with Integrated Scale, Porcelain White
As an affiliate, we earn on qualifying purchases.
Choose a drying method that suits your kitchen
A dehydrator gives you the most consistent airflow and temperature, while air-drying suits small amounts of sturdy herbs in a clean, dry room. An oven can work at its lowest setting if it stays gentle and lets moisture escape, but delicate leaves can overheat before you notice.| Method | Best fit | Watch for |
|---|---|---|
| Dehydrator | Mixed household harvests and repeatable drying | Follow the appliance guidance; leave space around sprigs |
| Air-drying | Small bunches of rosemary, thyme, oregano, or sage | Humidity, dust, and tightly packed bundles |
| Low oven | A small batch when the oven can run gently | Excess heat and trapped moisture |
Use low heat and airflow to protect delicate aroma
Low heat and steady airflow help herbs dry before warmth drives off too much of the volatile oil that gives them their aroma. Many herbs dry in a dehydrator at roughly 95–115°F (35–46°C), but the right setting depends on the herb, the leaves, the humidity, and your appliance. Set the dehydrator according to its manual, then check the leaves as they dry instead of trusting a fixed timer. A thin layer of mint may finish before thick sprigs of sage. If the kitchen smells intensely of basil while the machine runs, that fragrance is leaving the leaves and filling the room; gentle heat helps keep more of it in the jar for later. Airflow matters as much as temperature. Crowded leaves hold moisture between their surfaces, so spread a large harvest across more trays or dry it in batches. In a small off-grid kitchen, a clean mesh screen near a protected, well-ventilated area can help a modest amount of sturdy herbs dry without using electricity. Keep the screen out of direct sun, away from cooking smoke, and beyond the reach of pets. An oven is the least forgiving option. Use its lowest setting, leave a way for moisture to escape if the appliance allows it safely, and check often. If your oven runs hot or cannot hold a low temperature, choose another method for basil and other tender leaves. Never prop open an oven door if your appliance instructions prohibit it.Follow these checks to know when herbs are fully dry
Herbs are ready for storage when their leaves crumble readily and their stems snap instead of bending. Use texture as your main test, because drying time can range from a few hours in a dehydrator to several days by air, depending on the plant and the room.- Check the thickest sprig. The largest stem in the batch usually dries more slowly than a small leaf. If it bends, return the whole batch to the rack or dehydrator.
- Rub one cooled leaf. A dry leaf should crumble between your fingers instead of feeling soft or leathery. Let a warm sample cool first, since warmth can disguise remaining moisture.
- Break the stem. Listen and feel for a clean snap. A pliable stem needs more drying, even when the leaves around it look crisp.
- Recheck before packing. Inspect the thickest pieces and any leaves that overlap. If one area feels damp, keep drying the batch rather than sealing it.