
TL;DR

Get kitchen gear delivered free with Prime
- Fast, free delivery on millions of items
- Prime Video, Amazon Music and more included
- Member-only deals all year
You can smoke meat without electricity by using charcoal, wood, and basic equipment. Maintaining steady temperature and smoke levels is key for flavor and safety—this guide shows you how.
Smoking meat is an age-old craft, blending flavor, preservation, and patience. You don’t need an electric smoker to achieve rich, smoky goodness—just a few traditional tools and some know-how. If you’re off-grid or want to rely on natural fuels, this guide walks you through every step to get perfectly smoked meat.
From choosing the right equipment to controlling temperature with airflow, you’ll learn how to turn simple fuels into a slow, steady smoke that transforms your meat into something extraordinary—no plug required.
Use a simple charcoal or wood smoker and control temperature by adjusting airflow and fire size.
Soak wood chips before adding to prolong smoke and prevent flare-ups.
Maintain steady low temperatures (225°F–275°F) for best results—use a thermometer and vents.
Experiment with different hardwoods to craft unique flavor profiles.
Prioritize safety: outdoor use, clear area, and fire safety essentials.
How to Smoke Meat Without Electricity
You can smoke meat without electricity by using charcoal, hardwood, and basic airflow control. The whole craft comes down to steady low heat, clean smoke, patience, and a thermometer you trust.
Low and slow heat helps build smoke flavor while reducing harsh scorching and flare-ups.
Ribs often need 4–6 hours; brisket and tougher cuts may need 8–12 hours.
Control beats equipment. Vents, fuel size, and meat placement matter more than a plug-in smoker.
Pick a smoker that fits your space and fire style.
Charcoal smokers, offset barrels, kamado grills, and simple DIY drum builds all work off-grid. Choose by batch size, portability, and how much fire tending you want to do.
Kettle or small charcoal smoker
Best for camping, patios, and first attempts. Create indirect heat by banking coals to one side and placing meat away from flame.
Offset firebox smoker
Ideal for larger batches. Wood burns in a side chamber, sending heat and smoke across the meat for steady, indirect cooking.
Steel drum or box build
Useful for preservation projects and off-grid setups. Keep it food-safe, stable, vented, and free from questionable coatings.
Six moves turn simple fuel into clean smoke.
Start with a small, stable fire. Then adjust oxygen and fuel in small increments so the smoker stays calm instead of swinging hot and cold.
Light coals
Use a chimney starter with paper and dry charcoal.
Build indirect heat
Keep meat away from direct flame and charring.
Add soaked wood
Use chunks or chips for slow smoke release.
Set vents
Open for more heat, close slightly to cool down.
Track temperature
Hold the chamber between 225°F and 275°F.
Rest meat
Let juices redistribute before slicing or pulling.
Choose smoke wood by flavor, not just heat.
Hardwoods burn cleaner and bring distinct aroma. Avoid softwoods because resins can create harsh flavors and unwanted compounds.
| Fuel or wood | Best use | Flavor profile | Off-grid control | Beginner friendly |
|---|---|---|---|---|
| Lump charcoal | Primary heat source | Clean, neutral base | ✓ | ✓ |
| Hickory | Pork, ribs, brisket | Bold and classic | ✓ | ~ |
| Oak | Beef, large cuts | Steady and balanced | ✓ | ✓ |
| Apple or cherry | Poultry, pork, ribs | Sweet and fruity | ✓ | ✓ |
| Softwoods | Avoid for food smoking | Resinous and bitter | ✗ | ✗ |
The low-and-slow temperature band
Match your cut to the patience it needs.
Smoking is slow transformation. Longer sessions give connective tissue time to soften, while steady smoke builds layered flavor without bitterness.
Fire control is food safety.
Smoke outdoors, clear the area around the smoker, keep raw and cooked meats separate, and use internal temperature rather than guesswork. The goal is clean smoke, not billowing white clouds.
- 1Use a thermometer for both chamber heat and meat doneness.
- 2Add fuel in small amounts to prevent sudden temperature spikes.
- 3Soak chips for about 30 minutes before adding them to coals.
- 4Adjust vents gradually and wait before correcting again.
- 5Keep water, sand, or an extinguisher nearby when cooking outdoors.
The no-electric smoke system.
Every good batch connects the same five ideas: fuel, airflow, temperature, smoke quality, and rest time.
Charcoal
Creates the steady coal bed.
Vents
Control oxygen and heat.
Hardwood
Adds clean flavor layers.
Thermometer
Confirms safety and texture.
Rest
Preserves juice and tenderness.
Pick the Right Non-Electric Smoker for Your Space
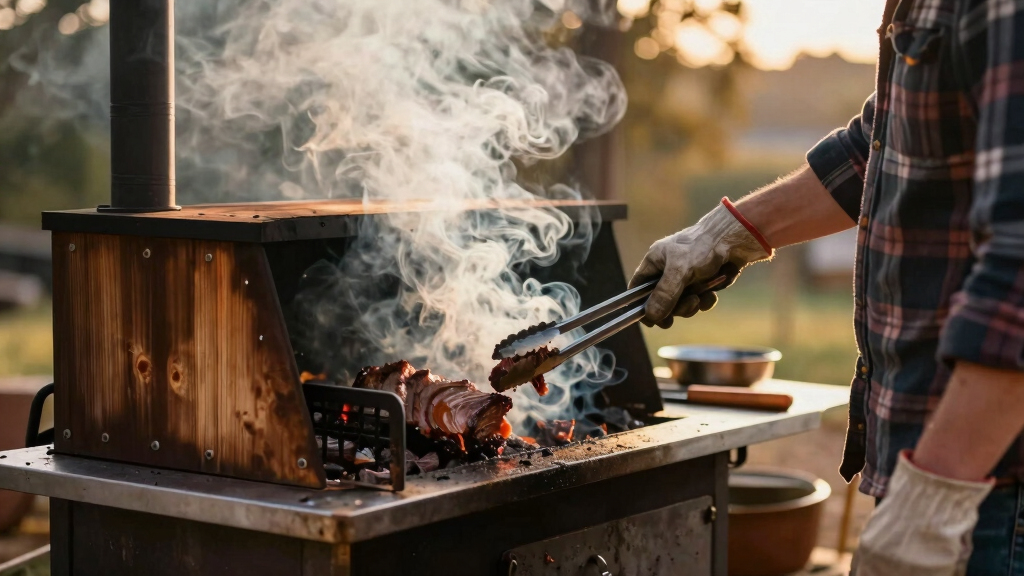
Choosing your smoker is step one. For off-grid cooking, the best options are charcoal smokers, offset units, or DIY builds from metal drums. These setups use natural fuels and give you control over heat and smoke.
For example, a basic horizontal offset smoker made from a repurposed steel barrel can hold enough wood and meat to feed a small gathering. It’s durable, simple to operate, and doesn’t need electricity.
When selecting, consider size, portability, and your fuel preferences. For camping or small spaces, compact kettles or makeshift box smokers work well. Larger setups are great for serious preservation or family-sized batches.
As an affiliate, we earn on qualifying purchases.
How to Use Charcoal and Wood to Generate Flavor and Heat
Charcoal and wood are your main fuels. To start, light your charcoal using a chimney starter—no lighter fluid needed, just crumpled paper and dry charcoal. Once hot, arrange coals to create indirect heat. This method ensures a controlled, consistent temperature, which is crucial because fluctuations can cause uneven cooking or spoilage.
Add soaked wood chips or chunks on top of the coals to produce smoke. For example, soaking applewood chips for 30 minutes before adding can give your ribs a sweet, fruity aroma. The type of wood influences flavor—hardwoods burn cleaner and impart distinct tastes, while softwoods can introduce undesirable resins or chemicals, so choosing the right wood is essential for safety and flavor integrity.
Keep the fire steady by adjusting vents. Opening vents increases airflow, raising temperature; closing them lowers it. Consistent airflow keeps your temperature in that perfect 225°F–275°F zone for hours, which is vital for thorough cooking and safe meat preservation. The tradeoff is that managing airflow requires attentiveness—over-venting can cause excessive heat, while under-venting can extinguish your fire or produce insufficient smoke. Mastering this balance is key to predictable results.
As an affiliate, we earn on qualifying purchases.
Maintain a Steady Temperature Without Electricity
Controlling temperature without electricity hinges on airflow and fire management. Start with a small fire, then open or close vents to regulate heat. Keep a lid slightly ajar to prevent overheating. This method relies on understanding how fire intensity and oxygen flow influence temperature—more oxygen means more combustion and higher heat, while restricting oxygen cools the fire and reduces temperature.
For example, if your smoker begins to climb past 275°F, partially close the vents to reduce airflow and lower the temperature gradually. Conversely, if it drops below 225°F, open vents to increase oxygen supply and boost heat. Use a simple meat thermometer to track internal temps—aim for 145°F for poultry, 190°F for pulled pork. The challenge is that external conditions like wind, ambient temperature, and humidity can affect your fire, so adjusting vents becomes a nuanced skill that improves with practice. This method’s tradeoff is that it demands constant attention and quick reflexes, but it offers precise control over your smoking environment, which is critical for safety and flavor consistency.
In practice, a seasoned hand can keep a smoker running steady for hours just by adjusting vents and adding small splits of wood or coal as needed. It’s a dance of patience and observation, where understanding the behavior of your specific setup makes all the difference.
As an affiliate, we earn on qualifying purchases.
How to Add Smoke Flavor with Natural Woods
The secret to rich smoky flavor? Quality wood. Hardwoods like hickory, oak, cherry, or apple provide distinct tastes and burn cleanly. Soak wood chips in water for 30 minutes—this prolongs smoke production and prevents immediate flare-ups. The choice of wood directly impacts flavor complexity; for example, cherry adds a sweet, fruity aroma, while hickory offers a bold, smoky taste. Soaking reduces the risk of flare-ups caused by rapid combustion, enabling a more controlled smoke release that infuses your meat evenly. The type of wood and its moisture content influence not only flavor but also the amount of smoke produced and the longevity of your smoke session—more smoke isn’t always better, as excessive smoke can lead to bitter flavors or undesirable residues. Balancing the amount and timing of wood addition allows you to craft nuanced flavors, making your meat not just smoked but deeply flavored with layers of aroma.
Experiment with different woods or blends to match your flavor profile. Remember: more smoke isn’t always better—balance is key. This understanding allows you to tailor your smoking process, creating complex, well-rounded flavors that elevate your preserved meats.
As an affiliate, we earn on qualifying purchases.
Step-by-Step: How to Smoke Meat the Old-Fashioned Way
- Gather your smoker, charcoal, wood chunks, meat, and thermometer.
- Preheat your smoker with a small bed of hot charcoal and soaked wood chips. This initial setup ensures your fire is stable and ready for sustained smoking, which is critical since temperature fluctuations can compromise meat safety and texture.
- Rub your meat with spices—think paprika, salt, pepper, garlic powder. Seasoning enhances flavor and can also act as a barrier to moisture loss, helping the meat stay tender during long smoking sessions.
- Place the meat on the grate, away from direct flames. This indirect heat method prevents charring and promotes slow, even cooking, which is essential for tenderness and flavor development.
- Adjust vents to keep the temperature between 225°F–275°F. Add wood chips every hour to maintain a consistent smoke level. Consistency in temperature and smoke is vital because fluctuations can cause uneven cooking, spoilage, or bitterness from excessive smoke.
- Maintain steady heat and smoke for the duration—ribs usually need 4–6 hours, brisket 8–12 hours. Longer cooking times allow collagen to break down, resulting in tender, flavorful meat. Rushing this process can leave meat tough or undercooked.
- Check internal temperature—145°F for poultry, 190°F+ for tougher cuts. Using a reliable thermometer ensures safety and optimal texture, avoiding under- or overcooking.
- Rest the meat after smoking for juicy results. Resting allows juices to redistribute, preventing them from spilling out when cut, which preserves flavor and moisture.
Patience is your best tool. Smoked meat is about slow, gentle transformation, not quick heat. Each step influences the final quality—skipping or rushing stages diminishes flavor, tenderness, and safety.
Compare Your Options: DIY, Off-the-Shelf, & Portable Smokers
| Feature | DIY Metal Drum | Commercial Offset Smoker | Portable Kettle |
|---|---|---|---|
| Cost | Low, can be built from scrap | Moderate to high | Affordable, portable |
| Ease of Use | Requires some DIY skills | Simple, designed for smoking | Very easy, compact |
| Size | Variable, depends on build | Large, suitable for big batches | Small, perfect for camping |
| Control | Vents and fire management | Vents and built-in thermometer | Limited, manual control |
Safety Tips for Off-Grid Smoking
Fire safety is paramount. Always smoke outdoors in a well-ventilated area, away from flammable materials. Keep a fire extinguisher or water nearby.
Never leave your smoker unattended for long periods. Use heat-resistant gloves and tools to handle hot parts. And always check local regulations about outdoor burning, especially in dry seasons.
Remember: good ventilation prevents dangerous smoke buildup and reduces fire risk.
Frequently Asked Questions
Can I smoke meat indoors without electricity?
It’s generally not recommended due to fire and smoke inhalation risks. Outdoor smoking is safer and more authentic. If you must, use a well-ventilated, dedicated outdoor space or a smoker designed for outdoor use.
How long does it take to smoke different meats without electricity?
Timing varies: ribs take about 4–6 hours, brisket 8–12 hours, chicken 3–4 hours. Always monitor internal temp with a meat thermometer for safety and doneness.
What wood is best for flavor and safety?
Choose hardwoods like hickory, apple, cherry, or oak. Avoid softwoods like pine, which can produce toxic smoke. Soaking wood chips helps control smoke and flare-ups.
Can I make my own smoker from household materials?
Yes. A common DIY approach is repurposing a metal drum, old kettle, or even a large cardboard box with some venting. Just ensure it’s safe, secure, and used outdoors.
What’s the biggest challenge in non-electric smoking?
Maintaining consistent temperature and smoke levels. It takes practice to learn how to adjust airflow and fire size for steady results over several hours.
Conclusion
Smoking meat without electricity isn’t just possible—it’s a deeply satisfying skill that reconnects you with traditional flavors. With patience, attention, and simple tools, you can produce tender, smoky meat that rivals any modern setup.
Next time you fire up that manual smoker, remember: the real flavor comes from your hands, your fire, and your patience—no electricity needed.
Halloween Picks
halloween
As an affiliate, we earn on qualifying purchases.