
TL;DR
Open a free Amazon Business account
Business pricing, bulk buying and tax-exempt orders.
Create a free accountAs an affiliate, we earn on qualifying purchases.
Making sauerkraut involves shredding cabbage, salting it properly, and fermenting in controlled conditions. This step-by-step guide helps you master safe, flavorful fermentation with minimal fuss.
There’s something deeply satisfying about turning fresh cabbage into tangy, crunchy sauerkraut by hand. It’s not magic—just science, patience, and a little practice. Once you get the hang of it, you’ll see how simple, affordable, and endlessly rewarding home fermentation can be.
This guide walks you through every step—no shortcuts, no guesswork. Whether you’re new or looking to refine your technique, you’ll learn how to produce a vibrant, safe batch that keeps for months. Ready to turn humble cabbage into a jar of living, delicious history? Let’s get started.
Use a precise 2% salt by weight for consistent, safe fermentation.
Keep shredded cabbage submerged under brine to prevent spoilage.
Maintain fermentation temperature around 18–22°C (65–72°F) for balanced flavor.
Don’t rush—taste and evaluate after at least one week, often more.
Watch for signs of spoilage—discard if mold, bad smell, or discoloration appear.
Making Sauerkraut Step by Step
Turn fresh cabbage into tangy, crunchy sauerkraut through accurate salting, firm packing, oxygen control, and patient fermentation. The process is simple; consistency comes from measuring the variables that matter.
From whole cabbage to living ferment
Follow the sequence, keep every shred below the brine, and let naturally occurring lactic-acid bacteria convert cabbage sugars into preserving acids.
Clean
Wash the jar, weight, tools, work surface, and hands. Rinse away detergent residue. Sterilization is usually unnecessary.
Prepare
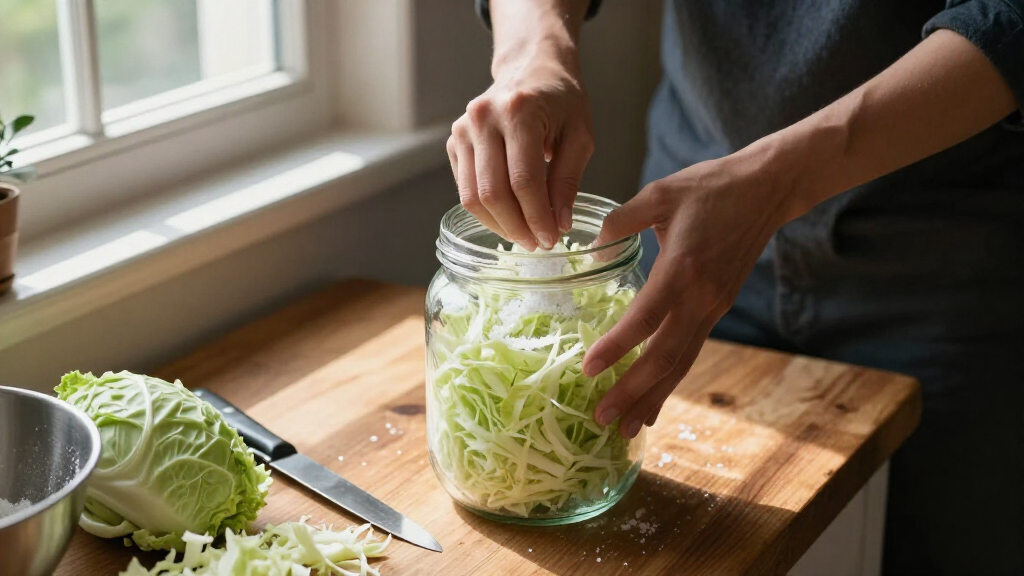
Remove damaged leaves, reserve one clean follower leaf, quarter the cabbage, remove the core, and shred evenly.
Weigh + salt
Weigh the prepared cabbage and add 20 grams of non-iodized salt per 1,000 grams of cabbage.
Massage
Squeeze or pound until the cabbage becomes glossy, wilted, and releases clear, slightly viscous liquid.
Rest
Wait 15–30 minutes so the salt can draw out additional moisture and create the natural brine.
Pack
Add cabbage in small portions. Press firmly after each addition to remove trapped air and release more liquid.
Submerge
Add the follower leaf and fermentation weight. Keep every cabbage shred beneath the brine.
Cover
Use an airlock, crock cover, or loose-fitting lid. Leave several centimeters of headspace and allow gas to escape.
Ferment
Store away from sunlight at 18–22°C. Watch the brine level, bubbling, aroma, and surface condition.
Taste + chill
Begin tasting after one week. Refrigerate when the flavor is pleasantly sour and the texture remains crisp.
Salt is a ratio, not a spoonful
Crystal size varies across salt types, so volume measurements are inconsistent. A kitchen scale makes the recipe repeatable.
The 2% calculation
Quick formula: cabbage weight in grams × 0.02 = salt weight in grams.
The three control levers
What each variable changes
The best batches balance bacterial activity, texture, aroma, and oxygen exclusion rather than maximizing fermentation speed.
Salt
About 2% by weight supports a reliable lactic-acid fermentation. Too little can invite spoilage; too much can delay acid development.
Temperature
18–22°C gives a useful balance of fermentation speed, clean acidity, and crunch. Avoid direct sunlight and rapid temperature swings.
Oxygen
Complete submersion creates the low-oxygen environment beneficial bacteria prefer while discouraging mold and unwanted yeasts.
| Condition | Fermentation speed | Likely texture | Aroma and flavor | Best response |
|---|---|---|---|---|
| ✓18–22°C | Moderate and steady | Crisp to tender | Balanced, clean, pleasantly sour | Maintain and monitor |
| ~Below 18°C | Slower | Often crisper | Milder development | Allow additional time |
| ~Above 22°C | Faster | More likely to soften | Stronger aromas and acidity | Move to a cooler location |
| ✕Cabbage above brine | Uncontrolled surface growth | Potentially slimy or damaged | Possible yeast, mold, or off-odors | Assess carefully; discard if spoiled |
Healthy changes versus warning signs
Use sight, smell, and texture together. When contamination is fuzzy, colored, putrid, or spreading beneath the surface, discard the entire batch.
Normal fermentation
- Bubbles, gentle fizzing, or temporarily rising brine
- Cloudy brine and harmless sediment at the bottom
- A clean, pleasantly sour, cabbage-like aroma
- Color fading from bright green to pale yellow
- Little visible bubbling in a cool room or under an airlock
- A tangy flavor with a crisp or pleasantly tender texture
Discard the batch
- Fuzzy black, pink, orange, blue, or green growth
- A rotten, putrid, or sewage-like odor
- Pink or orange discoloration within the cabbage
- Severe sliminess combined with an unpleasant smell
- Contamination spreading below the brine surface
- Any condition that leaves safety genuinely uncertain
About kahm yeast: A flat white film is generally considered harmless, but it can affect flavor. It is different from fuzzy or colored mold. If the appearance or smell is uncertain, the safer choice is to discard the batch.
A practical fermentation timeline
Calendar time is guidance, not a finish line. Temperature, cabbage, salt distribution, jar size, and personal taste all influence the result.
Press firmly, add all released liquid, apply the weight, and confirm full submersion.
Check the brine level and lid. Bubbles, cloudiness, and a clean sour aroma are common.
Use a clean utensil. Refrigerate if it is tangy, crisp, fresh-smelling, and enjoyable.
Continue fermenting for stronger acidity, then chill before the flavor moves beyond your preference.
Why the method works
The batch-saving checklist
Precision at the beginning and simple observation during fermentation prevent most common problems.
Weigh the salt. Use approximately 20 grams for every 1,000 grams of prepared cabbage.
Keep it below the brine. Exposed cabbage is vulnerable to oxygen-loving spoilage organisms.
Give gas an exit. Use an airlock or a safely loosened lid; never trap pressure in a standard sealed jar.
Ferment moderately. Aim for 18–22°C and begin tasting after roughly one week.
Refrigerate the finished ferment. Keep it submerged and serve only with clean utensils. Homemade sauerkraut is not shelf-stable unless processed with a tested canning method.
Start with clean equipment—why it matters and how to do it right
Cleanliness is the foundation of safe fermentation. You don’t need to sterilize every tool, but everything that touches your cabbage must be spotless. Think: no soap residue, no bacteria from dirty hands or surfaces.
Use hot water and a brush or cloth to scrub your jar, weights, and utensils. Rinse thoroughly. If you want extra peace of mind, you can wipe with a vinegar solution or boil glass jars for 10 minutes—nothing more complex than that.
For example, I once missed cleaning my fermentation weight properly and ended up with a cloudy, off-tasting batch. It’s a small step that prevents big problems.
As an affiliate, we earn on qualifying purchases.
How to prepare cabbage for sauerkraut — step-by-step
- Remove damaged outer leaves and reserve one clean leaf for later use as a follower beneath the weight.
- Quarter the cabbage, cut out the core, and shred it evenly with a sharp knife or mandoline. Aim for thin, uniform strips about 2-3 mm thick.
- Weigh the shredded cabbage on your kitchen scale. For every 1,000 grams, add about 20 grams of non-iodized salt—around 2%.
- Massage or pound the cabbage with clean hands or a pestle until it softens, and it releases a clear, slightly viscous liquid. Let it rest for 15-30 minutes to draw out more moisture.
For example, a medium head of cabbage weighing 1.5 kg will need about 30 grams of salt. The process of massaging is where the magic begins—your cabbage should become glossy and wilted, ready to pack.
salting and shredding cabbage tools
As an affiliate, we earn on qualifying purchases.
As an affiliate, we earn on qualifying purchases.
Packing and submerging—how to keep your cabbage safe from spoilage
Transfer the salted cabbage into your jar in small batches, pressing firmly after each addition. This removes air pockets and encourages the release of more liquid. Use a tamper, the back of a spoon, or your clean hands.
Place the reserved cabbage leaf over the top if you like, then add your fermentation weight. It should sit firmly on the cabbage, keeping everything submerged under its brine. The goal: no cabbage bits poking above the liquid.
Leave at least 2-3 centimeters of headspace because fermentation produces gases that need room to escape. For example, a half-liter jar with 400 grams of shredded cabbage will need about 8-10 mm of headspace.
Why is this important? Proper packing and submersion are critical because oxygen exposure encourages mold and undesirable bacteria. Ensuring the cabbage stays beneath the brine creates an anaerobic environment, which is essential for the beneficial bacteria to thrive. Insufficient submersion can lead to spoilage, off-flavors, and inconsistent results. Balancing the amount of cabbage, salt, and pressure ensures a stable ferment, producing consistent, flavorful sauerkraut every time.
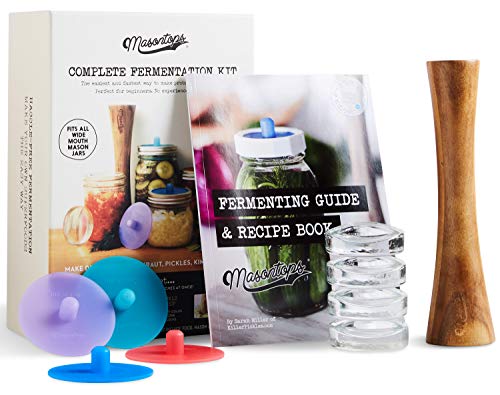
Masontops Complete Mason Jar Fermentation Kit – Pickle Kit, Sauerkraut Making Kit Kimchi Container – Fermentation Airlock Lids Wide Mouth Mason Jars
- Complete Fermentation Kit: Transforms 4 jars into fermenters
- Includes 9 Essential Pieces: Lids, weights, tamper, and recipe book
- Versatile Fermentation Options: Make sauerkraut, kimchi, pickles, and hot sauce
As an affiliate, we earn on qualifying purchases.
As an affiliate, we earn on qualifying purchases.
Cover your jar properly — avoid common pitfalls
Use an airlock lid, a loose-fitting lid, or a traditional fermentation crock cover. If using a standard jar lid, don’t tighten it fully—gas needs to escape. An airlock system makes this easier, releasing CO2 automatically and reducing oxygen exposure.
For example, I once sealed a jar too tightly, and it built up pressure until the lid bulged. That’s a recipe for mess or broken glass.
Fermentation should be a gentle, bubbling process—if you see bubbles or smell sour, you’re on the right track.
As an affiliate, we earn on qualifying purchases.
Temperature and timing—the sweet spot for tasty sauerkraut
Keep your jar between 18–22°C (65–72°F), away from direct sunlight. Warmer temps speed up fermentation, but risk softening and overly strong aromas. Cooler temps slow things down but can produce a crisper finish.
Expect to wait at least one week before tasting. Many batches develop a richer flavor in 2-4 weeks. For example, in a cozy kitchen at 20°C, I usually taste around day 14 and find it perfectly balanced.
Patience is key—rushing can lead to soft, overly sour, or uneven results.
How to tell when your sauerkraut is ready—sniff, taste, and look
Normal signs of healthy fermentation include bubbling, a cloudy brine, and a pleasantly sour cabbage aroma. The color may fade from bright green to a softer yellow. Sediment at the bottom is typical.
Start tasting after a week. If it’s tangy, crunchy, and smells fresh, it’s good. If you prefer it more sour, let it ferment longer. If it tastes bland or off, discard and start anew.
For example, I’ve had batches that tasted great at two weeks and others that improved after six.
Spotting spoilage—what to watch out for and what to discard
If you see fuzzy mold—especially black, pink, blue, orange, or fuzzy growth—discard the batch. The same applies if it smells rotten, sewage-like, or putrid. Pink or orange discoloration inside the cabbage can be a sign of contamination.
White film, called kahm yeast, is harmless but can affect flavor. If growth is fuzzy or colored, or if there’s a slimy texture combined with bad smell, it’s safer to toss it.
Why is this important? Recognizing spoilage indicators helps prevent foodborne illnesses and ensures you enjoy safe, delicious sauerkraut. When in doubt, trust your senses—smell, sight, and texture are your best guides. Proper handling and prompt disposal of spoiled batches protect your health and the integrity of your fermentation process.
Storing your sauerkraut—keeping it fresh and safe
Once it tastes good and smells right, transfer your sauerkraut into the fridge. Cold slows fermentation and microbial activity. Keep it submerged under brine, use clean utensils to serve, and avoid cross-contamination.
Properly stored, it can last several months. If it develops an off smell, sliminess, or mold, discard it. Remember, homemade sauerkraut isn’t shelf-stable unless canned using tested procedures.
For example, I’ve kept a jar in my fridge for over three months, and it’s still crunchy and tangy. The key: always keep it submerged and handle with clean tools.
Key variables that influence your sauerkraut’s success
Salinity, temperature, and oxygen control are the big three. Use about 2% salt by weight—too little invites spoilage, too much slows fermentation. Keep your cabbage submerged to prevent oxygen exposure, which encourages mold and yeasts. And maintain a steady temperature around 18–22°C for the best balance of speed and flavor.
For example, I once fermented in a too-warm kitchen and ended up with mushy, overly sour kraut. Adjusting temperature and salinity makes all the difference in the final product.
Latest trends and how they can improve your sauerkraut-making
Modern fermenters use weight-based recipes, airlock lids, and small batches for more consistent results. These tools minimize oxygen contact and make it easier to control fermentation. Many home fermenters now experiment with spices like juniper, garlic, or even apple slices for different flavors.
For example, I recently added a teaspoon of caraway seeds to a batch and loved the subtle, nutty aroma that complemented the tangy cabbage.
Avoid these common mistakes—save yourself time and waste
Don’t measure salt by volume—use a scale for accuracy. Never use too little salt; it invites unwanted bacteria. Keep cabbage below the brine—use weights, not just the lid. Don’t overfill the jar, and avoid sealing it tightly without an airlock. Don’t ferment in direct sunlight or overly warm environments.
For example, I once left my jar in a sunny windowsill, and the result was a soft, overly sour mess. Follow the steps carefully, and your kraut will reward you with crunch and flavor.
Frequently Asked Questions
How much salt should I use for sauerkraut?
Use about 2% of the cabbage’s weight in non-iodized salt. For example, 20 grams of salt for every 1,000 grams of shredded cabbage. This balance promotes healthy fermentation and good texture.
Can I add water or do I need extra brine?
Usually, the cabbage releases enough liquid when salted and massaged. Only add extra brine if necessary, and always salt it properly to maintain the right concentration. Plain water dilutes the salt, which can slow or spoil fermentation.
How long does it take to ferment sauerkraut?
It generally takes one to four weeks, depending on temperature and personal taste. Taste regularly after the first week—longer fermentation results in a tangier, more complex flavor.
Why isn’t my sauerkraut bubbling?
It could be the room’s too cool, or the jar isn’t sealed tightly enough to see bubbles. Bubbling isn’t the only sign of fermentation—smell and taste are better indicators of progress.
What should I do if mold appears?
If you see fuzzy, colored mold, especially black or fuzzy white, discard the entire batch. While kahm yeast (white film) is harmless, fuzzy mold indicates contamination that can be unsafe.
Conclusion
Making sauerkraut by hand isn’t just about fermentation—it’s about connecting with a tradition of preservation that’s as old as civilization. Focus on cleanliness, patience, and attention to detail, and you’ll get a jar of vibrant, tangy kraut that keeps your kitchen lively.
Remember: each batch is a lesson in natural magic—trust the process, and enjoy the journey in every crunchy bite.
Pool season Picks
robotic pool cleaners
As an affiliate, we earn on qualifying purchases.