
TL;DR

Get kitchen gear delivered free with Prime
- Fast, free delivery on millions of items
- Prime Video, Amazon Music and more included
- Member-only deals all year
Fermented pickles are made by submerging cucumbers in salty brine and allowing natural bacteria to produce lactic acid. This process preserves the cucumbers and develops complex flavors, requiring careful salt measurement, temperature control, and full submersion for safety and crunch.
Imagine biting into a crisp, tangy pickle—its bright acidity and complex flavor brewed over days of natural fermentation. Making your own fermented pickles isn’t just about preservation; it’s about creating a lively, healthful food using simple tools and natural processes. You’ll learn how to turn fresh cucumbers into probiotic-rich snacks, all while avoiding the pitfalls of spoilage or unsafe fermentation.
This guide walks you through every step—choosing the right cucumbers, measuring salt precisely, keeping everything submerged, and controlling temperature for perfect results. No fancy equipment needed—just your hands, a jar, and a bit of patience.
Use small, firm cucumbers and trim the blossom end to maximize crunch and fermentation success.
Measure salt precisely with a digital scale, aiming for 2.5–5% salt in your brine for safety and texture.
Keep cucumbers fully submerged under brine to prevent spoilage and promote even fermentation.
Maintain a steady temperature around 20°C (68°F); avoid direct sunlight or temperature fluctuations.
Verify acidity with a pH meter or test strips to ensure safety before refrigerating or storing long-term.
How to Make Pickles by Fermentation
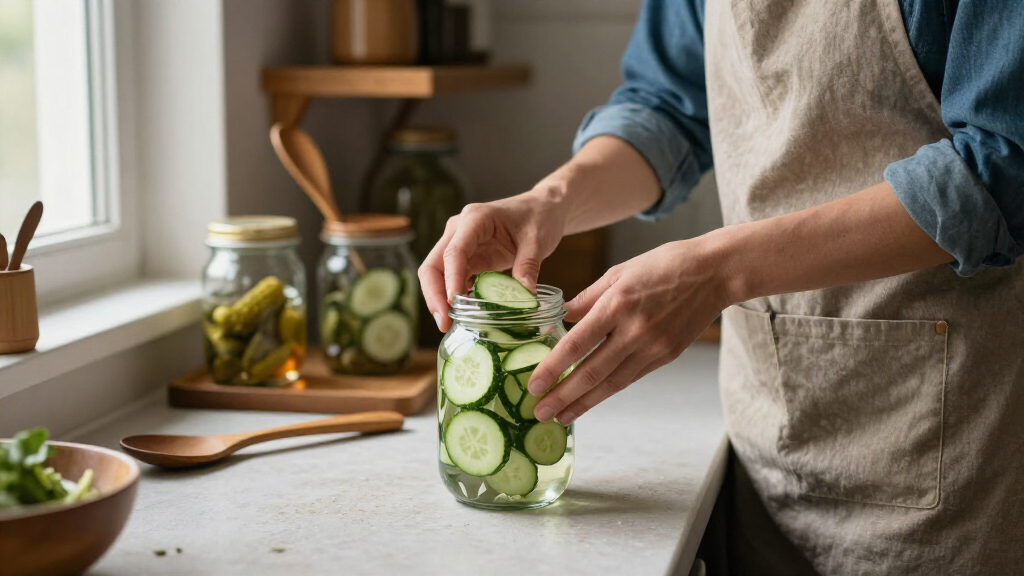
Crisp, tangy, probiotic-rich pickles brewed the natural way: cucumbers submerged in salty brine, where lactic-acid bacteria turn sugar into acid over days — no vinegar, no heat, no fancy equipment. Just salt, time, and patience.
Five Rules for a Safe, Crunchy Batch
Use small, firm cucumbers and trim the blossom end to maximize crunch and fermentation success.
Measure salt by weight with a digital scale — aim for 2.5–5% brine for safety and texture.
Keep cucumbers fully submerged under brine to prevent mold, yeast, and spoilage.
Maintain a steady ~20°C (68°F); avoid direct sunlight and temperature swings.
Verify acidity with a pH meter or strips before refrigerating or storing long-term.
Brine Concentration: The Safety Dial
| Salt Percentage | Salt per Liter of Water | Character |
|---|---|---|
| 2.5% | 25 grams | Fast ferment · softer texture |
| 3.0% | 30 grams | Everyday small-batch standard |
| 3.5% | 35 grams | Balanced speed and firmness |
| 5.0% | 50 grams | Slow, salty · extra spoilage protection |
Choose Well, Keep It Under
Pick the Best Cucumbers
Small, firm, freshly harvested pickling cucumbers — free of bruises, yellowing, or hollow spots. Wash under cold running water without soap, and trim a thin slice from the blossom end: it carries softening enzymes. Whole cucumbers stay crunchier than spears or slices, though slices ferment faster.
Full Submersion = Insurance
Anything poking above the brine meets oxygen — and oxygen invites yeast, mold, and spoilage. Use fermentation weights, a food-safe insert, or a brine-filled zip bag. Leave headspace for gas buildup, and vent or use an airlock. Spot surface mold? Something floated up — adjust weights and top up brine.
Dechlorinate First
Chlorine inhibits the very bacteria you’re cultivating. Use filtered or dechlorinated water, and non-iodized, additive-free salt — pickling, kosher, or sea salt. Anti-caking additives cloud brine and interfere with fermentation.
Simple & Safe Tools
Food-safe glass jars, weights, and an airlock lid cover the basics. Avoid reactive metals like aluminum or copper — they taint the brine. A digital scale, pH meter, and thermometer add consistency. Sterilize everything; keep a tray under the jar for overflow.
The Sweet Spot: 18–22°C
Slow
Ideal
Risky
When Are They Ready?
Days · Slices & Spears
Lightly fermented, half-sour character. Bubbles, cloudy brine, and a bright sour aroma signal active fermentation.
Weeks · Whole Cucumbers
The classic timeline at ~20°C. A batch of small picklers is often perfect at day 10 — beyond that, more sour, more soft.
Weeks · Fully Sour
Extended fermentation for maximum tang. Verify with a pH meter or strips — time alone doesn’t establish safety.
From Cucumber to Pickle, Step by Step
Sterilize
Clean jar, lid, weight, utensils, and work surface.
Prep Cukes
Wash firm picklers; trim each blossom end thin.
Pack Jar
Add garlic, dill, mustard seed, peppercorns, chili.
Mix Brine
Dissolve weighed salt fully in dechlorinated water.
Submerge
Cover completely; weigh down; fit airlock or vent.
Verify & Store
Check pH < 4.6, taste, then refrigerate or process.
Normal Changes vs. Warning Signs
✓ Healthy FermentationAll Is Well
- Tiny bubbles rising in the brine
- Cloudy but clean-looking brine
- Sediment settling at the bottom
- Sour garlic-dill aroma
- Color shifting bright green → olive
✗ Discard the BatchWarning Signs
- Fuzzy mold on the surface
- Rotten or putrid smell
- Slimy texture or brine
- Unusual discoloration
- Persistent slime that won’t settle
Keep the Crunch, Store It Right
Pick the Best Cucumbers for Fermentation and Why It Matters
The first step is choosing small, firm, freshly harvested cucumbers. Think of them as the foundation of your pickle. They should be crisp, free of bruises, yellowing, or hollow spots. Avoid waxed or overripe cukes; they won’t stay crunchy or ferment well.
For example, a handful of bright green, firm pickling cucumbers from your local farm stand will outperform supermarket bulk cucumbers that have been sitting around. Washing under cold running water without soap is enough—no need for scrubbing too hard. Trim a thin slice from the blossom end, because that’s where enzymes can soften your pickles during fermentation. Whole cucumbers tend to stay crunchier longer than sliced or spear-cut ones, though slices ferment faster.
Using the right cucumbers is like setting a sturdy base—get it wrong, and the whole batch can turn soft or slimy.
As an affiliate, we earn on qualifying purchases.
Mastering Salt: The Key to Safe, Crunchy Fermented Pickles
Salt is the secret ingredient that makes fermentation safe and your pickles crisp. Use non-iodized, additive-free salts such as pickling, kosher, or sea salt. Measuring by weight is more reliable than by volume, because crystal size varies. For a standard small batch, aim for a brine of about 2.5–5% salt by water weight.
Here’s a quick guide:
| Salt Percentage | Salt per Liter of Water |
|---|---|
| 2.5% | 25 grams |
| 3% | 30 grams |
| 3.5% | 35 grams |
| 5% | 50 grams |
Lower salt levels ferment faster but risk spoilage. Higher salt slows fermentation and produces saltier pickles. For safety, stick to tested recipes—don’t just eyeball it.
Remember: precise salt measurement ensures the right microbial environment, giving you crunchy, flavorful pickles without spoilage.
As an affiliate, we earn on qualifying purchases.
Keep Your Cucumbers Submerged and Why It Prevents Spoilage
Imagine a lake with a surface exposed to oxygen—imagine the same for your ferment. Cucumbers must stay completely under the brine, away from air. Exposure invites yeast, mold, and spoilage organisms that ruin your batch.
Use fermentation weights, small food-safe inserts, or even a brine-filled zip bag to hold everything down. Leave some headspace in the jar because fermentation gases will build up, pushing the brine upward. An airlock makes venting easier, but a loosely fitted lid works if you vent carefully.
For example, if you notice a film or mold forming on the surface, it’s a sign some vegetables poked above the brine. Adjust by adding more brine or weights. Full submersion is your best insurance against spoilage.
As an affiliate, we earn on qualifying purchases.
Control Temperature to Get Perfect, Crunchy Fermented Pickles
Fermentation loves steady, moderate temperatures—around 18–22°C (65–72°F). Warmer conditions speed things up, but too hot (above 24°C/75°F) can make pickles soft, or introduce off-flavors. Cooler slows fermentation but keeps cucumbers crisp longer.
For example, in the summer, a sunny countertop might hit 25°C, risking over-softening. Keeping your jar in a shaded corner or on a cellar shelf stabilizes the temperature. Consistency is key—fluctuations upset the microbial balance.
Think of it like brewing tea—warm enough to activate the bacteria, but not so hot they turn bitter. A simple thermometer helps keep things steady.
As an affiliate, we earn on qualifying purchases.
Fermentation Time: When Are Pickles Ready to Taste?
Active fermentation usually shows bubbles, a pleasantly sour smell, cloudy brine, and a color change in cucumbers. The timing varies: 3–7 days for slices, 1–3 weeks for whole cukes, or longer for extra sourness.
For example, a batch of small pickling cucumbers might be ready in 10 days if kept at 20°C—beyond that, they get more sour and softer. Use a calibrated pH meter or test strips to verify acidity—aim for below pH 4.6, ideally around 3.2–3.8.
Time alone isn’t enough—taste and pH confirm when your pickles are safe and flavorful.
Refrigerate or Process? How to Keep Your Pickles Safe Long-Term
Once your pickles taste good and the fermentation stabilizes, refrigerate them to slow further fermentation. Cold storage prolongs freshness and flavor. If you want shelf stability, use a validated canning process—heat the jars to kill live cultures and seal them for long-term storage.
For example, a batch of homemade fermented pickles can last 3–6 months in your fridge if kept cool and submerged. But leaving them at room temperature without proper processing risks spoilage.
Remember: refrigeration keeps the probiotics alive, but heat processing makes them shelf-stable. Know what you want before sealing.
Tools and Equipment That Make Fermentation Easier and Safer
You don’t need much—just some food-safe glass jars, fermentation weights, and maybe an airlock lid. Avoid reactive metals like aluminum or copper—they can react with the brine and taint your pickles.
Filtered or dechlorinated water is best, as chlorine can inhibit fermentation. Special tools like a digital scale, pH meter, and thermometer improve consistency—especially if you’re experimenting with flavors or fermentation times.
For example, a sturdy 1-quart jar with a fermentation weight and an airlock lid makes the process cleaner and safer. Keep a tray underneath to catch overflow, and always sterilize your tools before use.
How to Keep Your Pickles Crunchy and Flavorful
Crunchiness depends on fresh cucumbers, correct salt levels, moderate temperature, and full submersion. Adding a pinch of calcium chloride, available as a food-grade product, can also help maintain firmness. Some fermenters soak cucumbers in ice water beforehand for extra crispness.
For example, if your batch turns out soft, check if you removed the blossom end or if the temperature was too warm. Adding tannin-rich leaves like grape or oak leaves can help, but they won’t fix old or wilted cukes.
Keep the batch refrigerated once it reaches your desired flavor—this halts the softening process and preserves that satisfying crunch.
Spotting Normal Changes and Warning Signs in Your Fermentation
Normal signs: tiny bubbles, cloudy but clean brine, sediment at the bottom, a sour garlic or dill aroma, and cucumber color shifting from bright green to olive. These indicate active, healthy fermentation.
Warning signs: fuzzy mold, rotten smell, slimy textures, unusual discoloration, or persistent slime. If these appear, discard the batch—don’t risk eating spoiled pickles.
For example, a small white film called kahm yeast can develop but isn’t harmful; it can be scraped off. But fuzzy mold or a foul odor means it’s time to toss that jar.
Flavoring Your Pickles Without Ruining Fermentation
Traditional flavors come from garlic, dill, mustard seeds, peppercorns, and chili. Keep ingredients clean and submerged to prevent mold. Large amounts of sugar or fresh herbs can alter fermentation speed and flavor—use sparingly.
For example, adding a few dill heads and garlic cloves will boost flavor without disrupting the process. Dried spices are easier to measure and less likely to introduce unwanted microbes.
Don’t add vinegar initially—that’s for quick pickles. Let the natural bacteria do their work first, then adjust flavors after fermentation if desired.
Food Safety Must-Knows for Home Fermentation
Always follow a tested recipe—casual adjustments can create hazards. Keep everything clean—hands, utensils, jars. Make sure cucumbers stay fully submerged beneath the brine to prevent oxygen exposure.
Maintain a stable, moderate temperature and verify acidity if unsure. Store finished pickles in the fridge unless you’ve processed them via a validated canning method. Discard any batch with mold, slime, or bad odors.
For example, if your jar develops fuzzy mold or a rotten smell, it’s safer to toss it than risk illness. Proper salt, full submersion, and correct storage are your best safeguards.
Latest Trends and Techniques in Fermented Pickles
Interest in fermentation has surged, especially among off-grid and zero-waste cooks. Many now measure salt by weight, use airlock lids, and monitor pH levels for reproducibility. Smaller jars with regional spice blends create variety and experimentation.
For example, some fermenters include calcium chloride to keep cucumbers crisp or try adding tannin-rich leaves for texture. Refrigeration has become the default for storing finished batches, rather than relying solely on room-temperature fermentation.
Research shows that unpasteurized, refrigerated pickles can contain diverse live cultures, but quantities and strains vary. They’re not automatically probiotic, but they do offer a vibrant, traditional flavor.
Frequently Asked Questions
How long do fermented pickles take to be ready?
Most batches are ready in 3–7 days for slices or small cucumbers, and 1–3 weeks for whole cukes. The exact timing depends on temperature, cucumber size, and your taste preference. Use taste and pH testing to determine when they’re perfect.Can I use regular table salt for fermenting pickles?
Yes, but it’s best to use non-iodized, additive-free salt like pickling or kosher salt. Iodine and anti-caking agents can affect flavor and clarity. Weigh the salt for accuracy and consistency.Why is my brine cloudy or foamy?
Cloudiness is usually caused by lactic-acid bacteria and sediment—normal during active fermentation. Foam can occur as well. As long as the smell is clean and sour, and there’s no mold, it’s safe. Discard if mold, bad odor, or slime appear.Is surface mold dangerous, and should I remove it?
Fuzzy mold indicates spoilage and should be discarded. A white film called kahm yeast isn’t harmful but can affect flavor. If mold or a rotten smell shows up, throw out the batch to stay safe.How do I keep my pickles crunchy?
Use fresh cucumbers, remove the blossom end, keep them fully submerged, and keep the temperature moderate. Adding a pinch of calcium chloride or soaking cucumbers in ice water beforehand can also help maintain crispness.Conclusion
Fermented pickles are a rewarding project—simple, natural, and full of flavor. The key is patience, precision, and attention to detail. Once you master full submersion, controlled temperature, and proper salt use, crunchy, tangy pickles become a reliable staple in your off-grid kitchen.
Remember: each batch is a small experiment in flavor and microbiology. Your hands, your tools, and your senses are the best guides. Now, go on—pick your cucumbers and start fermenting.
Columbus Day / Indigenous Peoples' Day Picks
long weekend sales
As an affiliate, we earn on qualifying purchases.